This process must be used to import raw MR images to a BrainVISA database. Primatologist processes are much more efficient when used with these databases, it is thus advised to use them. You should first create your own database as described in the data management section. It is advised to create one different database per study.
First, select an input raw MRI in your filesystem with the file brower icon . The subject name is automatically filled if the image has a patient_id header key, else the filename is used. (In expert mode, it is possible to fill such attributes based on the filename syntax). At this point, an output file should have already been automatically filled. The location of the output file in the database can be changed by specifying one or several of the mandatory attributes.
The mandatory attributes are the only ones that insure the unicity of the file in the database: the storing path will roughly be database/center/subject/acquisition/subject.format. In the case of longitudinal acquistions, it is thus advised to use different acquisition names for each time point (the use of the optional time_point attribute won't create different files in the database).
Multiple MRIs can be imported at once by iterating this process.
Description
Database creation
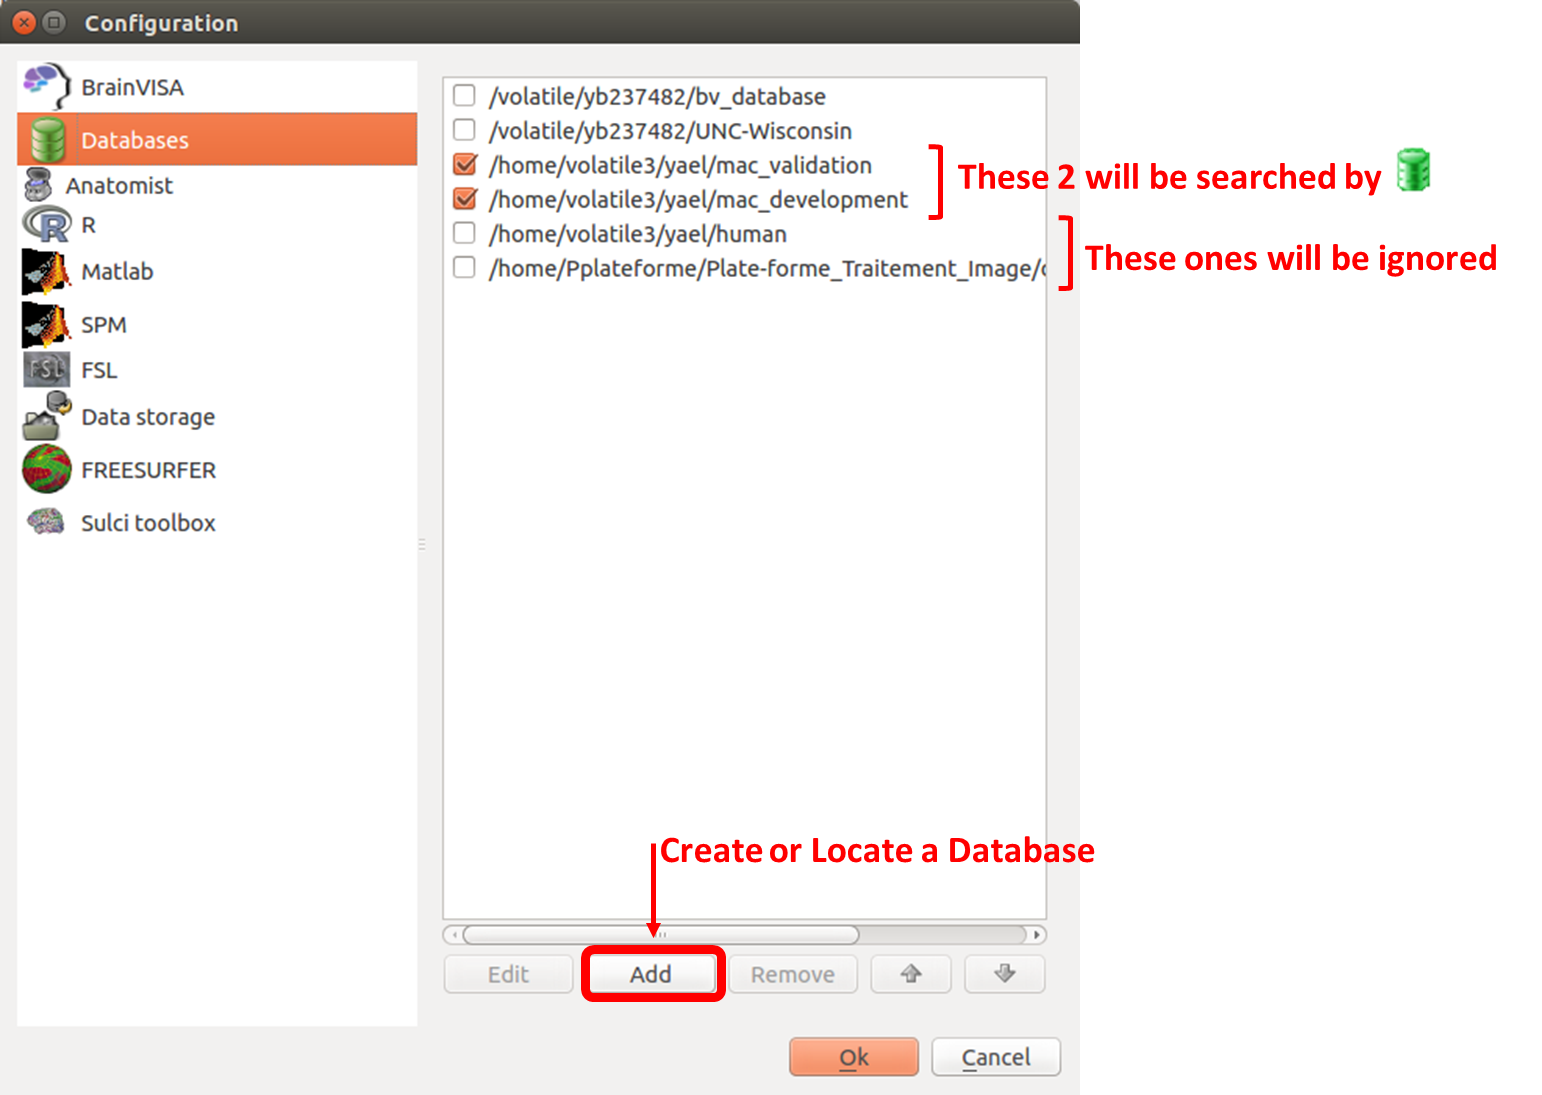
Database management can be accessed through the menu BrainVISA / Preferences... (Ctrl+P) / Databases. Use the Add button to create a new database (or locate an existing one) on your filesystem. Removing a database (with the Remove button) won't delete it from your filesystem, but BrainVISA will "forget" it.
Selected databases will be searched when browsing for files with the and buttons in processes. The bigger the selected databases, the more time it takes to search files. It is thus advised to only select databases you need for your current processing routine (Figure 1).
Figure 1. Database preferences.
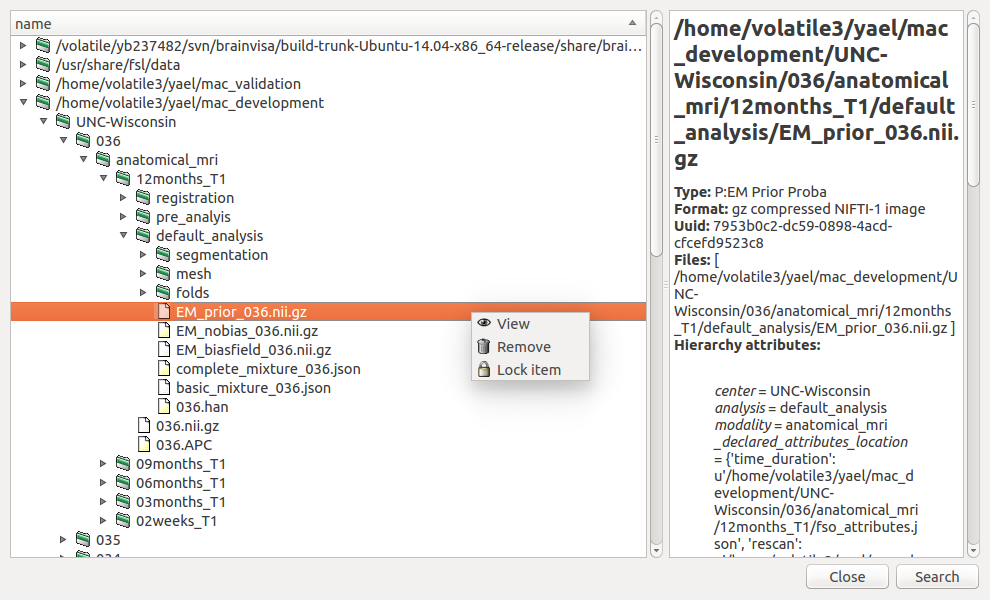
Database structures can be explored with the Database browser from the Data Management toolbox. This tool also allows to visualize files or remove files and folders from the database (Figure 2).
Primatologist database structure
Because Primatologist is able to process both T1- and T2-weighted images, its database structure slightly differs from that of Morphologist. An anatomical MRI modality folder contains all anatomical acquisitions, whatever their contrast, timepoint, etc.. Each acquisition is processed individually (for now, no multi-spectral analysis is possible, though we would like to add the possibility in a forseeable future). Each acquisition contains the raw data, a pre-analysis folder dedicated to preprocessing steps, a registration folder dedicated to referentials, transforms and atlas registration and an analysis folder dedicated to all further processing steps (segmentation, surfaces extraction, sulci graphes, etc.). (Figure 2).
Figure 2. Visualization of the structure of a Primatologist database with the database browser.
To keep track of processings with different parameters values, it is possible to create different analysis directories.
Importation of a single image
To import a single image:
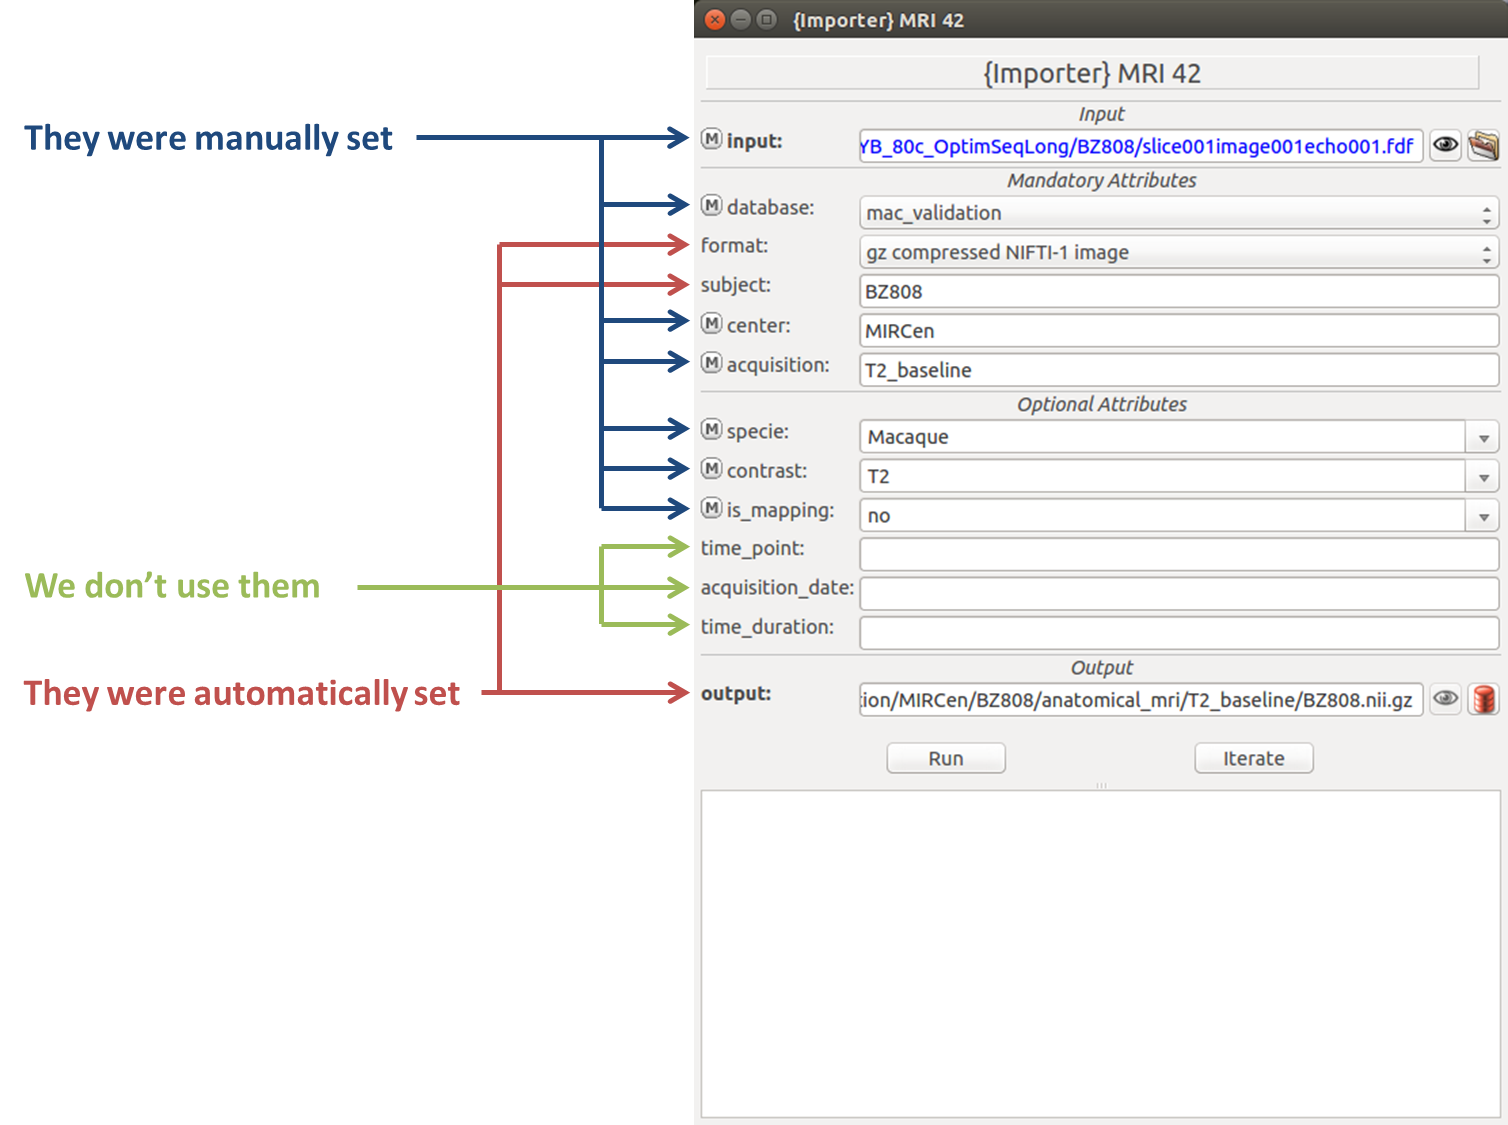
Open the importation process and select the raw file in your filesystem with the browser icon . If the file header has a patient_id tag, its value is used to fill the subject attribute, else, the filename is used.
Fill appropriately the needed attributes in the form.
Check that the output file was automatically filled as expected.
Click the Run button.
Figure 3. Importation of a single image.
Importation of multiple images
To import multiple images at once :
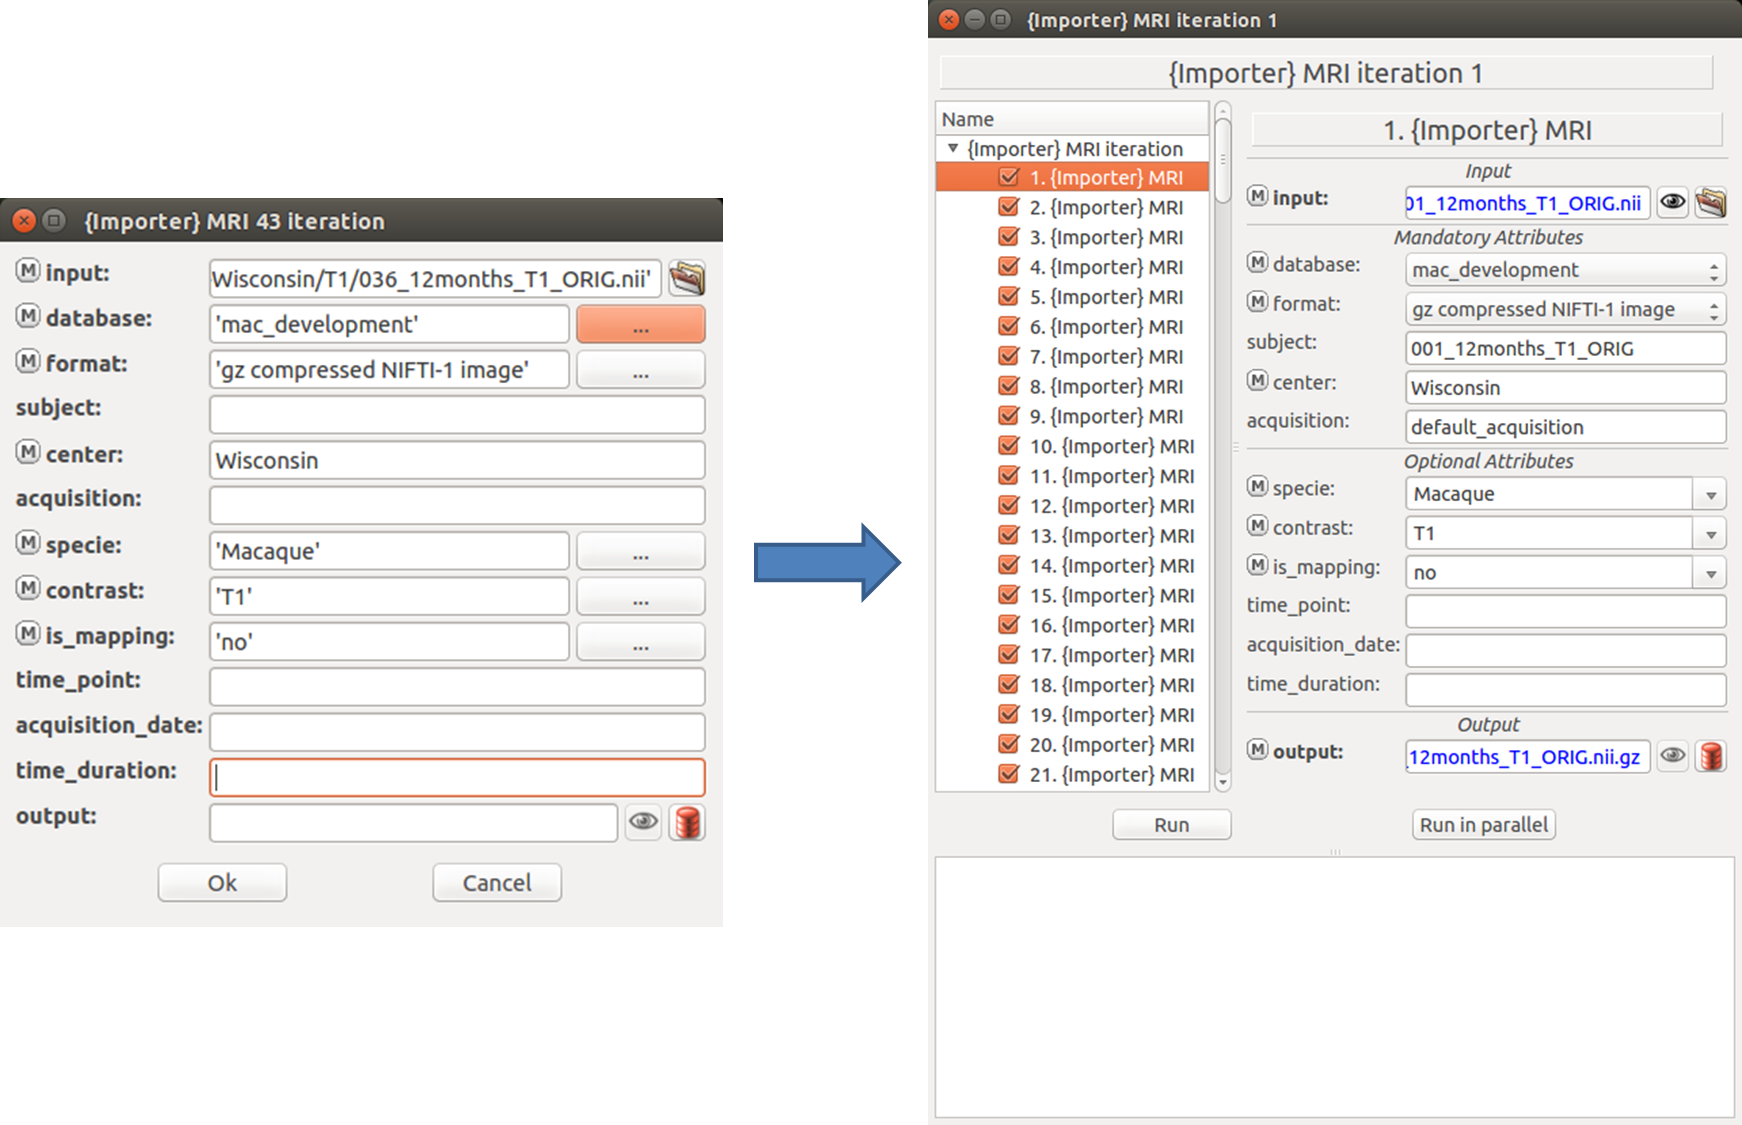
Open the importation process and click the Iterate button.
Use the filesystem browser to select all the files to import.
Fill The attributes appropriately. If the same value can be used for all the imported images, set it only once. Else, set as many values as there are input files, in the corresponding order. Note that for lists of choices, you must click the Add button for the choice to be effectively set.
Click OK. An iterated process must appear. If many files were selected, this might take some time.
Check that all attributes and output files were set correctely.
Click Run
Figure 4. Importation of multiple images.
Automatic filling with regular expression
In expert mode, regular expressions can be used to automatically fill attributes based on the filename structure through the auto_fill parameter. Use <attribute_name> to specify where the attributes appears in the filename. For example, if the filename is /path/to/file/MIRCen/mri_T2_ABC001.nii, use the auto fill format:
<center>/mri_<contrast>_<subject>\.<ext>
Note that the full format is a regular expression (regex), as such, the following special characters should be escaped if they appear in the filename: . (dot), ^ (caret), $ (dollar), * (star), ? (question mark), + (plus), [ (opening or closing square brackets), ( (opening or closing parenthesis), { (opening or closing braces), \ (backslash), | (vertical line). This allows you to use yout own regular expressions in the format string:
<center>/\w+/mri_<contrast>_<subject>\.<ext>
However, please do not use grouping parentheses as they are also used to detect attributes. This would break the underlying function.
Two optional arguments can also be used:
pattern should be given a regex pattern for the given attribute. It defaults to [\w\-]+ in the general case. <ext> is a special case, used to detect the file extension as a hint for the auto filling function, where pattern defaults to the list of acceptable file extensions.
map should be given a dictionary that maps values found in the filename to values attributes should be set to.
Acquisition name is very important for unicity in the database (see section "Primatologist database structure" above). We allow, through the auto_acquisition parameter, to automatically fill this attribute based on the other attributes. Syntax is similar to that of the auto_fill parameter:
Automatically fill attributes based on the filename structure. Syntax example: <center>/mri_<contrast>_<subject>\.<ext>. (See documentation for details)
auto_acquisition: String ( optional, input )
Automatically fill the acquistion attribute based on the values of other attributes. Syntax example: mri_<contrast>_<time_point>. (See documentation for details)
database: Choice ( optional, input )
Database in which the MRI must be imported.
format: Choice ( optional, input )
Output file format (in which the volume will be stored in the database).
subject: String ( optional, input )
Subject name or identifer
center: String ( optional, input )
Center in which the data was acquired.
acquisition: String ( optional, input )
Acquisition identifier. It should identify the contrast used in the case of multiple contrasts acquisitions and the timepoint in the case of longitudinal acquisitions.
specie: OpenChoice ( optional, input )
contrast: OpenChoice ( optional, input )
Is the image T1- or T2-weighted ? It will condition later processing.
is_mapping: OpenChoice ( optional, input )
Is the image a quantitative T1 or T2 map ? It will condition later processing.
. The subject name is automatically filled if the image has a patient_id header key, else the filename is used. (In expert mode, it is possible to fill such attributes based on the filename syntax). At this point, an output file should have already been automatically filled. The location of the output file in the database can be changed by specifying one or several of the mandatory attributes.
and
buttons in processes. The bigger the selected databases, the more time it takes to search files. It is thus advised to only select databases you need for your current processing routine (Figure 1).