Axon developer manual
Introduction
This document should teach how to program BrainVisa and to create custom processes. The audience is supposed to be familiar with Python language.
If you are not, you are encouraged to look at the Python tutorial and the Python documentation.
In addition to this manual, the reader may also have a look at Use cases of Axon python API.
Evolutions of Axon: CAPSUL
CAPSUL is a new pipelining system designed to replace Axon processes and pipelines API in the future. It is designed as an independent library, and has a different philosophy from Axon legacy system. CAPSUL is released with BrainVISA 4.5 but is not fully integrated yet.
Data management
The data management interface allows to organize data stored on a file system according to a (possibly user-defined) ontology. A BrainVisa user can provide a files and directories ontology (FDO) that is associated with a directory to define the organization of the whole directory’s content (including sub-directories). The FDO contains naming conventions that allow to identify any file according to an ontology. BrainVisa provides a database system which is based on FDO. This system is organized in three layers (See the figure below):
File formats
This layer groups the files in data items according to a set of file format definitions. All files corresponding to the same data are grouped in a single data item. For example, a data item can represent the header file (
*.hdr) and the data file (*.img) of an Analyze format image, or it can represent a set of DICOM files composing one MR acquisition.Files/Directories ontology
This layer uses an FDO definition to identify the data items. It sets the item’s data type and the item’s ontology attributes. The data type identifies the contents of a data item (image, mesh, functional image, anatomical MRI, etc). The data types are organized in a hierarchy making it possible to decline a generic type in several specialized types. For example, there is a 4D Image type which is specialized in 3D Image (indeed, a three-dimensional image is a particular case of a four-dimensional one); the type 3D Image is itself declined in several types, of which T1 MRI and Brain mask both belong indirectly. The ontology attributes define the way the data items are grouped and linked together. For example, all the data from one center could have the same value for the center attribute.
Query interface
This layer is the user entry point to the BrainVisa database system. It provides a query system that rely on data type and ontology attributes. A data query is composed of a file type and a set of attributes filters. The result of a query is a set of data items. For example, querying for data of type T1 MRI with attribute subject equal to
John Doewould return all T1-weighted exams of John Doe (provided that the FDO of the database defines a type named T1 MRI and a subject attribute).
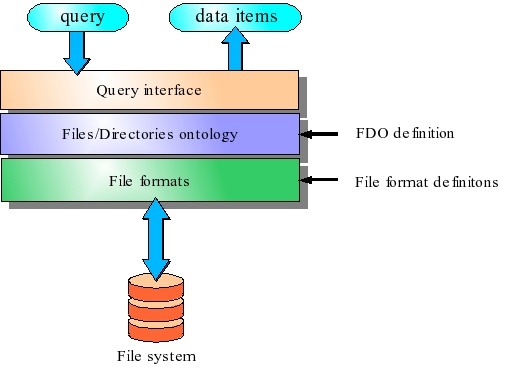
Architecture of BrainVisa data management system.
Software management
The software management system contains the architecture for the integration of various programs and libraries in a common environment. It provides a developpement environement that facilitates the integration of neuroimaging data processing or visualization software. This integration is done via a set of processes. A process is a Python script that declares its input and output parameters, it is composed of three parts (See the figure below):
Signature
The signature contains the definition of its parameters. A parameter has a name and a type. The knowledge of the parameter type makes it possible to BrainVisa to automatically generate a graphical interface to select values for the parameter. Some parameter types are related to the data management system and allows to select only specific values in the database. For instance it is possible to build a parameter that will only accept normalized fMRI images. In the example of the figure here, the image_input parameter only accepts data of type 4D Volume, therefore BrainVisa will raise an error if this process is called with an inappropriate data type such as a mesh.
Initialization
An initialization function called whenever a new instance of this process is created. It allows, for example, to set the default values of the parameters.
Body
The body is a function which is the entry point for the process execution. In the threshold example of the figure, it calls an external command-line program (
AimsThreshold) to actually perform the thresholding.
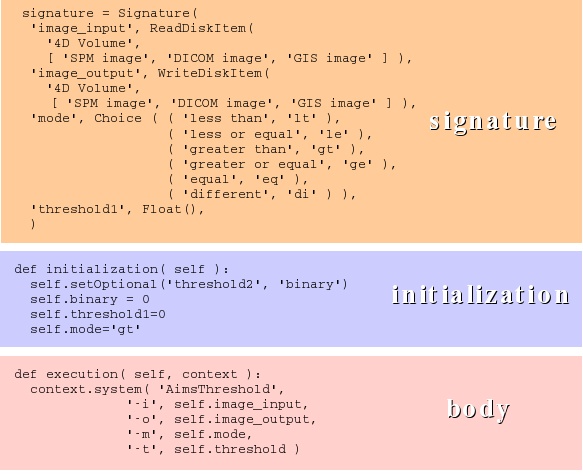
An example of a simple BrainVISA process: thresholding an image
Data ontology
BrainVisa uses a data ontology to organize its databases. This ontology describes data types, and the name and place of each data in the file system according to its type. BrainVisa has a default ontology but it is possible to complete it or to create another one.
Data ontology is described through:
types files that contain data types and formats
hierarchies files that contain rules to associate name, place in file system and attributes to each data type.
Types
Types files are in the brainvisa/types directory or in the types directory of a toolbox (See Toolboxes). They describe all data types and formats that will be recognized by BrainVisa. These files are written in Python. It is not mandatory to write several files but it is more practical to organize information. When a file uses types or formats described in another file, it is necessary to include a reference to this file. For example, registration.py uses builtin.py, so registration.py begins with:
include('builtin')
Format
A format is defined by a name and a pattern to identify files in this format. Generally the data format can be found with the files extensions. Some data may exist in different formats. For example, an MRI image can be written in Analyze, GIS, NIFTI formats…
Format(format name, list of the patterns, [attributes])
Example:
Format('GIS image', ["f|*.ima", "f|*.dim"])
In this example, the GIS image format defines a couple of files, one with
.imaextension and the other with.dimextension.A pattern begins with
"f|"to match a file or with"d|"to match a directory. In the rest of the pattern,"*"stands for any string.The above code lines creates an instance of the class
Formatwhich is defined in the modulebrainvisa.data.neuroDiskItems. At startup, BrainVisa loads all formats. It is possible to retrieve a particular format by its name using the functiongetFormat()or to get all existing formats withgetAllFormats().Type
A data type is defined by a name, a parent type and optionally a list of possible formats. Types are organized in a hierarchy.
FileType(<type name>, <parent type>, [<format name or list of format names>], [<attributes>])
Example:
FileType('4D Volume', 'Any Type', 'BrainVISA volume formats')
FileType('3D Volume', '4D Volume')
FileType('Texture', 'Any Type', 'Texture')
In this example, the 3D Volume type is a specialization of the 4D volume type and accept formats defined in the list named
"BrainVISA volume formats". It is also possible to directly put the list of formats names or only one format as for the Texture type. All types derive from the general type Any Type.As for formats,
FileTypeis a class defined in the modulebrainvisa.data.neuroDiskItems. UsegetDiskItemType()orgetAllDiskItemTypes()to retrieve types. To check if a type is a sub-type of another, usea_type.isA(another_type).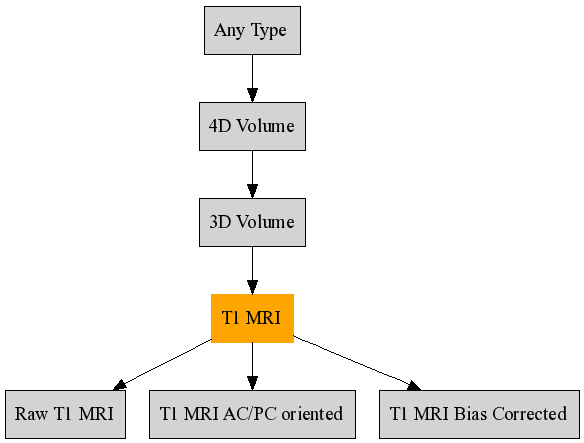
Example: Inheritance graph of the T1 MRI type
Hierarchies
A hierarchy in BrainVisa describes the organization of data in the database file system. Thanks to this description, the name and place of a file allows to guess its type and some information about it, as for example the center, subject or acquisition attributes associated to this data. It also makes it possible to write data in the database using the same rules, so the information can be retrieved when the data is reloaded later.
Hierarchy files are in the brainvisa/hierarchies directory or in the hierarchies directory of a toolbox (See Toolboxes). BrainVisa can use several hierarchies whose files are grouped in a directory named as the hierarchy. BrainVisa comes with three hierarchies: brainvisa-<version>, flat and shared. As for type files, hierarchy files are written in Python and information is generally spread across several files.
Syntax of hierarchy files
hierarchy=(<ScannerRuleBuilder>+)
<ScannerRuleBuilder> can be:
SetAttr(<attribute name>, <value>)
SetWeakAttr(<attribute name>, <value>) # associate this attribute with this value to the parent item.
SetType(<type name>) # set the type of the parent item. This type must be defined in types files.
SetContent(<pattern item>, [<ScannerRuleBuilder>]...) # describes the content of the parent item, which then must be a directory.
SetFileNameAttribute(<attribute name>)
SetFileNameStrongAttribute(<attribute name>)
SetDefaultAttributeValue(<attribute name>, <value>) # associate a default value to an attribute
SetPriority(<value>) # associate a priority to the rule, it helps *BrainVisa* to choose a rule if several match. The rule with highest priority will be used.
SetPriorityOffset([+-]<value>)
SetFormats(<formats list>)
The ScannerRuleBuilder class and derived classes are defined in brainvisa.data.fileSystemOntology.
Example
hierarchy = (
    SetWeakAttr('database', '%f'), # the database directory item will have an attribute "database" with the directory name as value
    SetContent( # describes the content of the database directory
        'scripts', SetContent('*', SetType('Script')), # describes a directory named "scripts" that contains files of type "Script".
        '*', SetType('Database Cache file'), # the database directory contains files of type "Database Cache file"
        '{center}', SetFileNameStrongAttribute('center'), SetType('Center'), # a directory whose name becomes the value of center attribute for any items below
        SetContent(
            '{subject}', SetFileNameStrongAttribute('subject'), SetType('Subject'), # a directory whose name becomes the value of subject attribute
                SetContent(
                    ...
              ),
          ),
      ),
)
Links between hierarchy files
A hierarchy description is spread across several files. Only one file defines the value of a hierarchy variable which describes the organization of the database directory.
The other files can add information using the functions insert() and insertFirst(). These functions enable to add rules in the content of a previously described directory.
include('base')

allKindsOfRefAndTrans = (
    '*', SetType('Referential'),
    '*', SetType('Transformation matrix'),
)

insertFirst('{center}/{subject}',
    'registration', SetType('Registration Directory'),
    SetContent(*allKindsOfRefAndTrans),
)
In this example, the call to insertFirst() adds information about subject directory described in base.py: it can contain a directory named registration that contains referential and transformation files.
It is also possible to add rules in the root directory of the database. To so, use insert("", ...).
Example (from the shared hierarchy in Morphologist toolbox):
include('base')

insert('',
    'anatomical_templates', SetContent(
        'MNI152_T1_1mm', SetType('anatomical Template'),
        SetWeakAttr('normalized', 'yes', 'skull_stripped', 'no',
            'Size', '1 mm', 'referential', '49e6b349-b115-211a-c8b9-20d0ece9846d',),))
Processes
A process is described in a Python file in the directory brainvisa/processes or in the processes directory of a toolbox (See Toolboxes), which may be divided into subdirectories to organize the processes. Each process file is read at BrainVisa start and used to create a class derived from the Process class, or more precisely from the NewProcess class, defined in brainvisa.processes.
To retrieve a particular BrainVisa process, use the function getProcess(<process name or id>). The name is the one defined in the process script. The id is the script filename without extension.
The Python script contains :
imports of Python modules used in the script. It must import at least
brainvisa.processesBrainVisa file:from brainvisa.processes import *
a declarative part: some variables initialization to set process
name,category,visibility level, parameters…initialization,validationandexecutionmethods
Declarative part
Name
name = string
The string defines the process english name. This name will appear in BrainVisa interface, possibly after a translation, see Translation.
Category
category = string
The string defines the english name of the process category. In BrainVisa interface, processes are grouped by category, it is useful to organize processes. As processes names, categories names may be translated.
Optional: if this attribute is missing, BrainVisa will set it to the parent directory path relative to brainvisa/processes. For example, the process p1 which Python script is brainvisa/processes/c1/c2/p1.py will have "c1/c2" as category.
Visibility level
userLevel = integer
This attribute defines the minimum user level required to see the process in BrainVisa interface. If the user level, defined in the preferences is lower than the process visibility level, the process will be hidden. **Warning: this level does not limit process execution, a hidden process can be executed yet, through another process for example.
Optional: The default visibility level is 0. The process is visible for all users.
Window maximized state
showMaximized = boolean
This attribute indicates if the process window is maximized or not.
Optional: The default maximized state is set to false.
Role
roles = (role, ...)
role <- viewer | editor | converter | importer
When a process defines one or more pre-defined roles, it can be used automatically by BrainVisa.
Viewer
A viewer is called when the user asks to see a data. Viewers are indexed by the type and format of data that they enable to display. To retrieve the viewer available for a specific data, use
getViewer(data[, enableConversion=1]). This function is defined inbrainvisa.processes.Axon 4.6 also introduces specialized viewers, which are attached to a process in order to reuse its parameters values. This is especially useful when a viewer needs several parameters, and has to run in the context of a process which may have custom parameters values. See the
brainvisa.processing.process_based_viewermodule documentation for details.Converter
A converter is called automatically when the user gives input or output process parameters that are not in a format supported by the process. A converter must have two parameters: the source and destination data. Converters are indexed by destination type and format and by source type and format. To retrieve a converter, use
getConverter(source, destination), or :getConvertersTo(destination)to get all possible converters for a destination data, orgetConvertersFrom(source)to get all possible converters for a source data.Editor
An editor is used when the user asks to edit a data. An editor has one parameter: the data to edit. Editors are indexed by data type and format. To retrieve an editor, use
getDataEditor(source[, enableConversion=1]).Importer
An importer is a process designed to import some data in the database. It is used mainly by a generic importer process to choose a specific importation process according to the data type. An importer must have one parameter: the source data. Importers are indexed by destintation data type. To retrieve an importer, use
getImporter(dataType).
Signature
Signature attribute defines input and output parameters of the process.
signature = Signature(parameter_list)
parameter_list <- parameter_name, parameter_type, ...
parameter_name <- identifier (see below)
parameter_type <- Parameter object (see below)
Each couple parameter_name, parameter_type defines a parameter. The parameter name is a string which must also be a possible Python identifier, so it contains only letters (uppercase or lowerrcase), digits or underscore character. Moreover some Python reserved word are forbidden (and, assert, break, class, continue, def, del, elif, else, except, exec, finally, for, from, global, if, import, in, print, is, lambda, not ,or , pass, raise, return, try, why). The parameter type is an instance of Parameter class and indicates the supported value type for this parameter. This class is defined in brainvisa.data.neuroData with several derived classes.
To create an instance, you can use one of the following constructors:
String(): the parameter value is a string.Number(): the parameter value is an integer or floatting point number.Integer(): the parameter value is an integer number.Float(): the parameter value is a float number.Choice(): the parameter value is choosen among a list of values given in the constructor’s parameters (see below Choice).Boolean(): the parameter has two possible values: 0 (false) and 1 (true). This object is equivalent toChoice(('true', 1), ('false', 0)).Point(),Point2D(),Point3D(): the parameter represents the coordinates of a point.ListOfVector(): a list of vectors of numbers.Matrix(): a matrix of numbers.ListOf(): a list of Parameters.ReadDiskItem: the parameter value is aDiskItemobject and represents one or several readeable files (see below ReadDiskItem).WriteDiskItem: the parameter value is aDiskItemobject and represents one or several writeable files (see below WriteDiskItem).
Example: Here is the signature of a thresholding process. input is the input image, output is the output image. threshold is the threshold value and method enables to choose the thresholding method.
signature = Signature(
    'input', ReadDiskItem("Volume 4D", ['GIS Image', 'VIDA image']),
    'output', WriteDiskItem('Volume 4D', 'GIS Image'),
    'threshold', Number(),
    'method', Choice('gt', 'ge', 'lt', 'le')
)
Some of these parameter types will be detailled below.
Parameter
Some attributes are common to all parameters:
mandatory: indicates if the parameter must have a value or not, default is True.
userLevel: indicates the minimum userLevel needed to see this parameter. Default is 0.
databaseUserLevel: Indicates the minimum userLevel needed to allow database selection for this parameter (useful only for diskitems).
browseUserLevel: Indicates the minimum userLevel needed to allow filesystem selection for this parameter (useful only for diskitems).
Choice
Syntax
Choice(choice_list)
choice_list <- choice_item, ...
choice_item <- value
choice_item <- (label, value)
A Choice parameter allows the user to choose a value among a set of possible values. This set is given as parameter to the constructor. Each value is associated to a label, which is the string shown in the graphical interface, possibly after a translation. That’s why a choice item can be a couple (label, value). When a choice item is a simple value, the label will be the string representation of the value (label = str(value)).
Examples
In the following example, the user can choose a number among three.
Choice(1, 2, 3)
The following example associates a label to each number.
Choice(('first', 1), ('second', 2), ('third', 3))
ReadDiskItem
The ReadDiskItem class is defined in brainvisa.data.readdiskitem.
Syntax
ReadDiskItem(file_type_name, formats [, required_attributes, enableConversion=1, ignoreAttributes=0])
formats <- format_name
formats <- [format_name, ...]
required_attributes <- {name: value, ...}
The value of this parameter is a readable DiskItem. This parameter type uses BrainVisa data organization (see Data ontology) to select possible files.
file_type_name enables to select files of a specific type, that is to say DiskItem objects whose type is either file_name_type or a derived type.
The formats list gives the exhaustive list of accepted formats for this parameter. But if there are some converters (see Role) from other formats to one of the accepted formats, they will be accepted too because BrainVisa can automatically convert the parameter (if enableConversion value is 1, which is the default).
required_attributes enables to add some conditions on the parameter value: it will have to match the given attributes value.
Warning
The type and formats given in parameters of ReadDiskItem constructor must have been defined in BrainVisa types and hierarchies files.
This method eases file selection by showing the user only files that matches type and format required for this parameter. It also enables BrainVisa to automatically fill some parameters values. The ReadDiskItem class has methods to search matching diskitems in BrainVisa databases:
ReadDiskItem.findItems(<database directory diskitem>, <attributes>): this method returns a list of diskitems that exist in that database and match type, format and required attributes of the parameter. It is possible to specify additional attributes in the method parameters. Found items will have the selected value for these attributes if they have the attribute, but these attributes are not mandatory. That’s the difference with the required attributes set in the constructor.ReadDiskItem.findValues(<value>): this method searches diskitems matching the value in parameter. This value can be a diskitem, a filename, a dictionary of attributes.ReadDiskItem.findValue(<value>): this method returns the best among possible value, that is to say with the more common attributes, highest priority. If there is an ambiguity, it returns None.
Examples:
ReadDiskItem('Volume 3D', ['GIS Image', 'NIFTI-1 image'])
ReadDiskItem('Cortical folds graph', 'Graph', requiredAttributes={'labelled': 'No', 'side': 'left'})
In the first example, the parameter will accept only a file whose type is 3D Volume and format is either GIS image or NIFTI-1 image, or a format that can be converted to GIS or NIFTI-1 image. These types and formats must have been defined first.
In the second example, the parameter value type must be “Cortical folds graph”, its format must be “Graph”. The required attributes add some conditions: the graph is not labelled and represents the left hemisphere.
WriteDiskItem
WriteDiskItem(file_type_name, formats [, required_attributes={}, exactType=0, ignoreAttributes=0])
formats <- format_name
formats <- [format_name, ...]
This parameter type is very close to ReadDiskItem (WriteDiskItem derives from ReadDiskItem), but it accepts writable files. That is to say, it accepts not only files that are accepted by a ReadDiskItem but also files that do not exist yet.
It has the same search methods as the ReadDiskItem class but these methods generate diskitems that may not exist yet, using data ontology information.
Functions
Some process functions can be defined in the script: validation, initialization and execution methods.
Validation
def validation():
    # function_body
    if <condition>:
        raise ValidationError("error message")
This function is executed at BrainVisa startup when the process is loaded. It checks some conditions for the process to be available. For example, the presence of modules, programs needed by the process. If the process is not available in the current context, the validation function should raise an exception.
When the validation fails, the process is not available, it is shown disabled in BrainVisa interface. Each validation error is reported in BrainVisa log.
Initialization
def initialization(self):
    # function_body
This method is called when a new instance of the process is created. It is used to initialize parameters, set some parameters as optional and define links between parameters.
The self parameter represents the process (and is an instance of Process class).
To initialize parameters values:
self.parameter_name = value
Each parameter defined in the signature corresponds to an attribute of the process object.
To set one or several parameters as optional:
self.setOptional(parameter_name)
The user does not need to fill these parameters. Other parameters are mandatory, if the user doe not fill them, BrainVisa will not execute the process and will show an error message.
To link a parameter value to another parameter:
self.linkParameters(destination, sources [, function])
self.addLink(destination, sources [, function])
The function linkParameters is used for the links inside a process. To define links between steps of a pipeline, the function addLink must be used.
linkParameters
The parameter destination value is linked to sources, which can be either one parameter or a list of parameters. If a value changes in sources, BrainVisa updates destination, if it still has its default value. If the destination parameter has been modified by the user, it has no more a default value and is not modified by such a link.
The optional argument function is a function that is called when the link is activated. The value returned by this function is used to set the destination parameter value. If there is no function, the source parameter is used directly. Anyway, the value of destination is evaluated with ReadDiskItem.findValue(value). The signature of the function is: function(process, process) -> value.
addLink
This function does quite the same thing that the linkParameters function except that the link is always activated when the sources change, even if destination has no more a default value. That is why this link can be used as an equality link between parameters of two different steps of a pipeline. For example, this function is used to define a link between the output of one step and the input of the next step.
Using the addLink method, the argument function is mandatory if there are several sources parameters: it takes as arguments the sources parameters and returns the value that must be used to find the destination parameter value: addLink(process, **sources) -> value.
This is very useful to help the user fill in the process parameters. With the links correctly defined, the user will enter the first input parameter and BrainVISA will try to complete all other parameters automatically, trying to find values in the database for the other parameters using attributes of the first parameter. The default BrainVisa link mechanism assumes that parameters have common attributes, for example the protocol, subject, acquisition, which is generally the case.
Execution
This function is called when the process is started. All mandatory parameters must be set. This function is written in Python.
def execution(self, context):
    # function_body
The self parameter of this function represents the process. It is mainly used to access parameters values: self.<parameter_name>.
The context object given as argument reprensents the execution context of the process.
Indeed, a process can be started in different contexts:
The user starts the process by clicking on the Run button in the graphical interface.
The process is started via a script. It is possible to run brainvisa in batch mode (without any graphical interface) and to run a process via a python function:
brainvisa.processes.defaultContext().runProcess(...)
The process is a converter, so it can be run automatically by BrainVisa when a conversion is needed for another process parameters.
The process is a viewer or an editor, it is run when the user clicks on the corresponding icon to view
 or edit
  another process parameter.
Execution context
The context object offers several useful functions to interact with BrainVISA and to call system commands. Here are these functions:
write,warning,error: prints a message, either in the graphical process window (in GUI mode) or in the terminal (in batch mode).log: writes a message in the BrainVisa log file.temporary: creates a temporary file.system: calls a system command.runProcess: runs a BrainVisa process.checkInterruption: defines a breakpoint.
Pipeline
A pipeline is a particular process that is a combination of several other processes. It describes through a sort of graph the processes that it contains and the links between them. Pipelines are convenient for users because they use the parameters link system over several processes and chain their execution, so it requires less user interaction and is quicker to run.
Writing a pipeline
Execution graph
A pipeline file is very similar to a process file, except in the initialization function where you have to define the execution graph of the pipeline. This is done by calling:
self.setExecutionNode(eNode)
eNode <- SerialExecutionNode | ProcessExecutionNode | ParallelExecutionNode | SelectionExecutionNode
The different types of execution nodes are detailed below.
SerialExecutionNode
SerialExecutionNode represents a series of processes that will be executed serially. It is generally the main node of a pipeline. It is used when the results of one step are needed to go on with next step.
SerialExecutionNode(name='', optional=False, selected=True, guiOnly=False, parameterized=None, stopOnError=True)
Example (first node of a pipeline):
eNode = SerialExecutionNode(self.name, parameterized=self)
To add the different steps, use the method: <serial_execution_node>.addChild(<name>, <execution_node>)
ParallelExecutionNode
Like SerialExecutionNode, ParallelExecutionNode it has children, but they may be executed in parallel.
ParallelExecutionNode(name='', optional=False, selected=True, guiOnly=False, parameterized=None, stopOnError=True)
Example:
eNode = ParallelExecutionNode('SulciRecognition', optional=True, selected=0)
ProcessExecutionNode
ProcessExecutionNode represents a leaf of the execution graph, this node cannot have children. It only calls one process, but obviously this process can be itself a pipeline. Any simple process has this type of execution node.
ProcessExecutionNode(self, process, optional=False, selected=True, guiOnly=False)
Example:
eNode.addChild('ConvertDatabase', ProcessExecutionNode('convertDatabase', optional=True))
SelectionExecutionNode
SelectionExecutionNode reprensents a choice between several alternative children. The user will select the process he wants to execute.
SelectionExecutionNode(name='', optional=False, selected=True, guiOnly=False, parameterized=None, stopOnError=True)
Example:
eNode = SelectionExecutionNode(self.name, parameterized=self)
eNode.addChild('BrainSegmentation05',
               ProcessExecutionNode('BrainSegmentation', selected=0))
eNode.addChild('BrainSegmentation04',
               ProcessExecutionNode('VipGetBrain', selected=True))
Example of a serial pipeline composed of 3 processes
eNode = SerialExecutionNode(self.name, parameterized=self)

eNode.addChild('ConvertDatabase',
               ProcessExecutionNode('convertDatabase', optional=True))

eNode.addChild('CheckDatabase',
               ProcessExecutionNode('checkDatabase', optional=True))

eNode.addChild('CleanDatabase',
               ProcessExecutionNode('cleanDatabase', optional=True))
Links between steps
Generally, the different steps of a pipeline are linked. For example, the output of the first process is the input of the second process. These links must be explicitely defined. So BrainVisa can automatically fill in parameters of the different processes that composed the pipeline.
execution_node.addLink(destination_parameter, source_parameter)
#Example:
eNode.addLink('ConvertDatabase.database', 'database')
eNode.addLink('database', 'ConvertDatabase.database')
# This is equivalent to:
eNode.addDoubleLink('ConvertDatabase.database', 'database')
In this example, the parameter database in the pipeline and in the sub-process ConvertDatabase are linked in both directions. So if the user changes the parameter value in the main process interface or in the sub-process interface, the value will be reported in the linked parameter.
Warning
Sometimes, it can be necessary to remove existing links in a process when it is included in a pipeline to avoid having two incompatible links towards the same parameter.
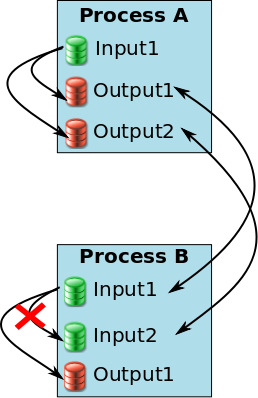
Example of a pipeline where links should be removed
In this example, when including the process A and the process B in a pipeline, new links are created to assess that A.Output1 is equal to B.Input1 and A.Output2 is equal to B.Input2. With these pipeline links, B.Input2 becomes linked to 2 parameters: A.Output2 and B.Input1. So, if the link between Input1 and Input2 in process B is not removed, the value of Input2 will be computed 2 times. But the second time (with the link in process B), the value of Input2 cannot be found because the file does not exist yet as it is an output of the pipeline. WriteDiskItems can generate new filenames for non-existing files but ReadDiskItems cannot.
In this case, this link should be removed in process B when creating the pipeline:
eNode.addChild("processA", ProcessExecutionNode("processA"))
eNode.addChild("processB", ProcessExecutionNode("processB"))
eNode.addDoubleLink("processA.Output1", "processB.Input1")
eNode.addDoubleLink("processA.Output2", "processB.Input1")
eNode.processB.removeLink("Input2", "Input1")
Graphical user interface
A graphical user interface is automatically generated by BrainVisa for each process. It allows the user to fill in the process parameters via a form, to run and iterate the process via buttons and to see output log via a text panel. This default interface can be customized in several ways to better fit the user needs. This section will give an overview of the available GUI customizations.
Replacing the buttons
By default, two buttons are displayed in a process window: Execute to run the process and Iterate to repeat the process on a set of data. It is possible to replace these default buttons with a custom interface by redefining the method inlineGUI.
def inlineGUI(self, values, context, parent, externalRunButton=False):
    widget = ... # Code to create the Qt widget that will replace the buttons
    return widget
The widget must have the parent widget given as parameter as a parent.
Example (from the ROI drawing process in the Tools -> roi toolbox)
def inlineGUI(self, values, context, parent, externalRunButton=False):
    btn = QPushButton(_t_('Show'), parent)
    btn.connect(btn, SIGNAL('clicked()'), context._runButton)
    return btn
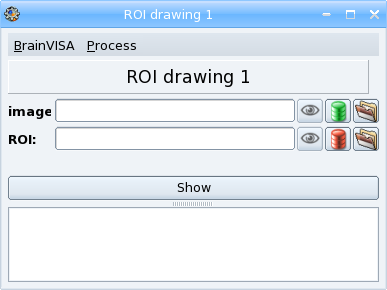
ROI drawing process
Here the default buttons are replaced with one button labelled “Show”. This button has the same role as the Execute button because its clicked signal is connected to the _runButton callback function, that is connected to Execute button by default.
The default GUI contains:
An Execute/Interrupt button whose click event is linked to the _runButton callback
An Iterate button whose click event is linked to the _iterateButton callback
If the process is an iteration, an Iterrupt current step button whose click event is linked to the _iterruptStepButton callback
If parrallel execution is available, a Distribute button whose click event is linked to the _distributedButton callback
Calling GUI functions
Sometimes, you do not need to customize the process parameter interface but you want to use custom windows during process execution to interact with the user. Of course, it is possible to do so but you will need to use a specific object to call GUI functions: the object returned by brainvisa.processing.qt4gui.neuroProcessesGUI.mainThreadActions(). Indeed, the process execution function is always started in a new thread to avoid blocking the whole application during process execution. But graphical interface functions have to be called in the main thread where the Qt event loop is running. The role of the mainThreadActions object is to enable passing actions to the main thread.
The mainThreadActions object has two methods:
push(self, function, *args, **kwargs): adds a function with its parameters to the actions list. It will be executed as soon as possible.call(self, function, *args, **kwargs)-> function result: sends the function call to be executed in the Qt thread and wait for the result.
Example (from the Show Scalar Features process in the Tools -> viewers* toolbox):
from brainvisa.processing.qt4gui.neuroProcessesGUI import mainThreadActions
import brainvisa.data.qtgui.scalarFeaturesViewer as sfv

def execution(self, context):
    data = readData(self.features.fullPath())
    view = mainThreadActions().call(sfv.ScalarFeaturesViewer)
    mainThreadActions().push(view.setData, data)
    mainThreadActions().push(view.show)
    return view
First, the call method of mainThreadActions is called to create an instance of sfv.ScalarFeaturesViewer widget. The call method waits for the call to be executed and returns the result: view. The result can then be used in the rest of the execution function. When we do not need the result of the next functions, the push method of the mainThreadActions object can be used.
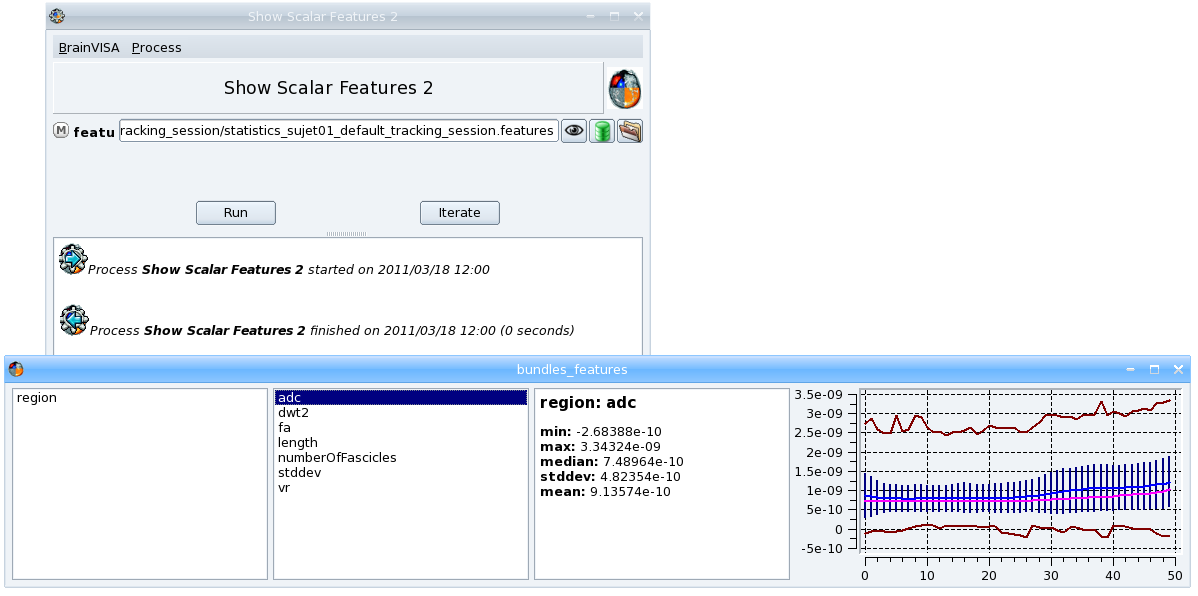
Show scalar features process
Changing the whole process window
In some cases, you may need to customize the whole process interface and not use at all the default interface generated from the process’s signature. It is possible to replace this default interface with a custom interface by redefining the method overrideGUI.
def overrideGUI(self):
    widget = ... # Code to create the Qt widget that will replace the default interface of the process
    return widget
Example (from the Database browser process in the Data Management toolbox):
from brainvisa.data.qtgui.hierarchyBrowser import HierarchyBrowser

def overrideGUI( self ):
    return HierarchyBrowser()
The HierarchyBrowser widget will be displayed when the process is opened instead of the default process window.

Database browser process
Note
Note that the method overrideGUI is an optional addition on a specific process. Its API is not defined at all in Process, but is used if the method is actually present in a process object.
Creating a viewer
Another way to add graphical features to BrainVisa is the creation of a viewer specialized for a type of data. A viewer is a special process that displays a view of the data given in parameters. At initialization, BrainVisa indexes all the viewers by type of data in order to call the appropriate viewer when a visualization of data is requested.
The button in process parameters interface is linked to the viewer associated to the data type of the parameter. In the Database browser process, the view command in contextual menu also calls the viewer associated to the data type of the current item.
A lot of BrainVisa viewers use Anatomist to display neuroimaging data. These viewers uses the Pyanatomist API, a python API that enables to drive Anatomist through python scripts. Refer to the PyAnatomist tutorial to learn how to use it.
BrainVISA has a slightly specialized brainvisa.anatomist module, which wraps the standard PyAnatomist module, and which allows to select a specific implementation, and to make smooth links with BrainVisa databases for automatic coordinates systems handling.
Example: Anatomist Show Volume:
from brainvisa.processes import *
from brainvisa.tools import aimsGlobals
from brainvisa import anatomist

name = 'Anatomist Show Volume'
roles = ('viewer',)
userLevel = 0

def validation():
    anatomist.validation()

signature = Signature('read',
    ReadDiskItem('4D Volume', aimsGlobals.anatomistVolumeFormats),)

def execution(self, context):
    a = anatomist.Anatomist()
    return a.viewObject(self.read)
This process will be used every time an item of type 4D volume needs to be visualized. The process is considered as a viewer because it has the role viewer in roles attribute and because it has only one mandatory input parameter.
Warning
All Anatomist objects and windows that should not be deleted at the end of the process must be returned by the execution function. Indeed, by default any python object is deleted when there are not references on it anymore. If the objects are returned, they will remain visible until the viewer process is closed.
Toolboxes
BrainVisa is organised into several toolboxes. A toolbox can contain processes and data ontology elements (types and hierarchy files). It groups processes that are related to a same domain (or made by the same team). Each toolbox can be developped, maintained and distributed by a different group / lab. Toolboxes do not have to be a part of BrainVisa project and can be quite independant.
How to create a toolbox ?
Files organisation
You must create in your project a directory brainvisa/toolboxes/<toolbox name>. In this directory, you may create three sub-directories: processes, types, ``hierarchies. Some files can be added to the toolbox directory: a configuration file named <toolbox_name>.py and optionally, an icon to represent the toolbox and a file named <toolbox_name>.minf that describes links between this toolbox and others.
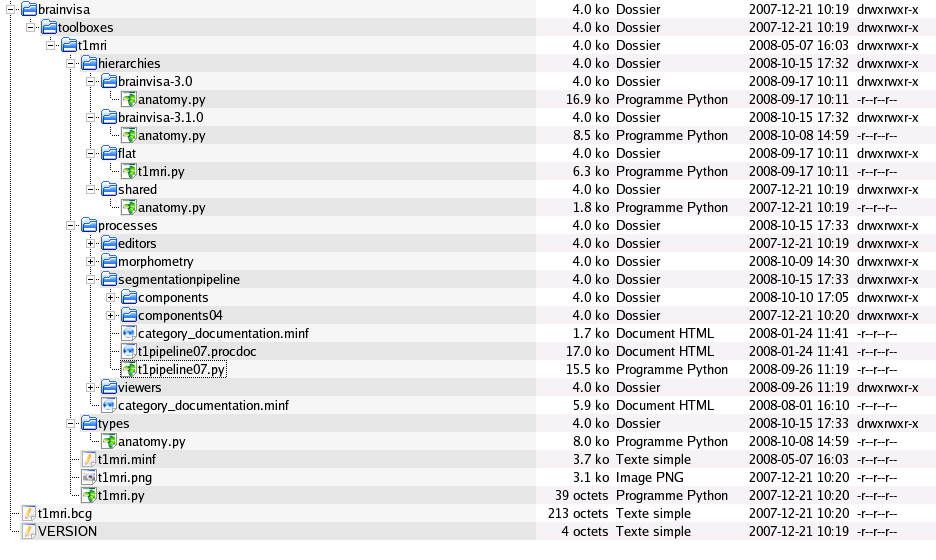
Example: Files organisation for the Morphologist toolbox
Configuration file
This file enables to configure three attributes of the toolbox:
userName: the name that will be displayed in BrainVisa interface.
icon: file path of the icon that will reprensent the toolbox in graphical interface. Optional, there is a default icon.
description: tooltip for the toolbox, that will be displayed when the mouse cursor is over the toolbox name. Optional, default tooltip is the name of the toolbox.
Example
userName = 'Morphologist'
icon = 't1mri.png'
description = 'Anatomical MRI processing'
Links with other toolboxes
Even if a process physically exists in only one toolbox, it is possible to create a link that makes it appear in several toolboxes. Information about these links is stored in a minf file named <toolbox_name>.minf. This file describes processes trees: a process tree by toolbox in which you want to add links. The file format is the same as the one used to save user lists of processes. So the easiest way to create such a file is to create user lists that correspond to the links you want to create, using BrainVisa graphical interface. Then you can get the resulting file in <home directory>/.brainvisa/userProcessesTrees.minf.
Here are the steps to add a link to a process in a toolbox:
Create a user lists by right clicking on the toolbox panel
Change its name into the destination toolbox’s identifier, it is the name of the toolbox directory.
Open the source toolbox and find the process
Copy the process or the category into the new list by drag and drop
You can rename the processes and categories if you want.
Save the file
userProcessesTrees.minfas<toolbox_name>.minfin your toolbox directory.
Be careful with categories, if you create a new one with the same name instead of making a link, you will not see the associated documentation when clicking on it.
Example: structural_analysis.minf
<?xml version="1.0" encoding="utf-8" ?>
<minf expander="brainvisa-tree_2.0">
  <l length="1">
    <f type="ProcessTree">
      <s name="name">Data management</s>
      <true name="editable"/>
      <l length="1" name="content">
        <f type="ProcessTree.Branch">
          <l length="1" name="content">
            <f type="ProcessTree.Branch">
              <l length="1" name="content">
                <f type="ProcessTree.Leaf">
                  <true name="editable"/>
                  <s name="id">importSPMtForStructuralAnalysis</s>
                  <none name="name"/>
                </f>
              </l>
              <true name="editable"/>
              <s name="name">Structural analysis</s>
              <s name="id">structural_analysis/volume_based/import</s>
            </f>
          </l>
          <true name="editable"/>
          <s name="name">import</s>
          <s name="id">data management/import</s>
        </f>
      </l>
      <true name="user"/>
      <s name="id">-1222536820</s>
      <s name="icon">folder_home.png</s>
    </f>
  </l>
</minf>
With this file, the Structural analysis toolbox adds its importation process in the Data Management toolbox.
Documentation page of the toolbox
It is recommended to create a presentation page for the toolbox to be displayed in BrainVisa right panel when the user clicks on the toolbox. This page should explain the usage of the toolbox and present the toolbox authors and related articles.
To create a help page, just create a file named category_documentation.minf and put it in the toolbox processes directory. This file has the same format as the documentation files for sub-directories in processes directory. See Documentation
Documentation
In BrainVisa, the panel on the right is dedicated to the documentation. When the user clicks on a toolbox, process or category (a sub-directory in processes directory), a help page is displayed in this panel. We will see in this chapter how to document processes and categories.
Process documentation
Each process documentation is stored in a file named <process file name>.procdoc which is placed in the same directory as the process file. This file is in minf format (xml). It can be edited with any text editor but there is a tool in BrainVisa that facilitates writing such a file. Select the process you want to document, right-click on it and select edit documentation. You can write the documentation in engish and in french but by default, if there is no documentation in the current language, BrainVisa shows the english documentation. So it is important to have at least an english documentation.
Example : convertOldDatabase.procdoc
<?xml version="1.0" encoding="utf-8" ?>
<minf expander="minf_2.0">
  <d>
    <d name="fr">
      <xhtml name="short"/>
      <d name="parameters">
        <xhtml name="graphe_default_destination"/>
        <xhtml name="segment_default_destination"/>
        <xhtml name="undo"/>
        <xhtml name="database"/>
      </d>
      <xhtml name="long"/>
    </d>
    <d name="en">
      <xhtml name="short">Database hierarchy has changed since BrainVISA 3.1. Databases created with earlier versions are not compatible with this version.
      This process  converts old databases to BrainVISA 3.1 hierarchy.
      It is compound of three steps : conversion, checking and cleaning (optional).</xhtml>
      <d name="parameters">
        <xhtml name="graphe_default_destination">The destination where you want to put unrecognized data found in graphe directory.
        By default, unrecognized data is put in t1mri folds directory.
        But you can choose to put it in t1mri roi or in pet roi directory.
        If you choose None, unrecognized data will stay in graphe directory.</xhtml>
        <xhtml name="segment_default_destination">The destination where you want to put unrecognized data found in segment directory.
        By default, unrecognized data is put in t1mri segmentation directory. But you can choose to put it in pet segmentation directory.
        If you choose None, unrecognized data will stay in segment directory.</xhtml>
        <xhtml name="undo">If true, the process will try to undo the last conversion of the database.</xhtml>
        <xhtml name="database">The database to process.</xhtml>
      </d>
      <xhtml name="long"><p>The first process of the pipeline is "Convert database".</p>
        <p>The second process is "Check database". In this process, the user can choose "Run later" instead of "Run now" to validate.
        So, the actions are not performed immediately, but kept for the end of the pipeline.</p>
        <p>The third process is "Clean database".
        This step is not mandatory, you can unselect it if you have data not linked to brainvisa in your database.</p></xhtml>
    </d>
  </d>
</minf>
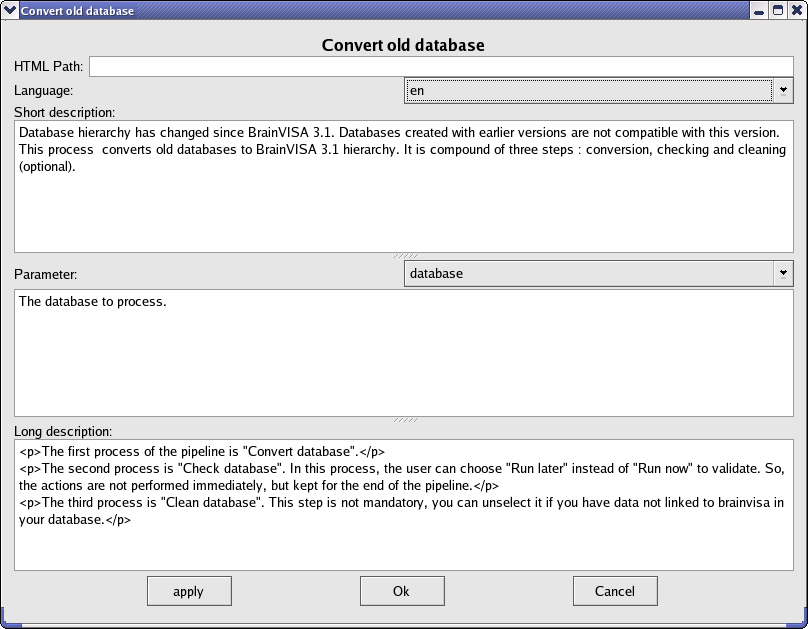
Interface for editing a process documentation
Each documentation field can contain HTML tags to modify display. It is also possible to include images in the documentation.
As we can see in the process documentation edition window, there are several fields to fill in :
HTML Path: optional, you can choose the path were you want to put HTML generated files. By default, they will be in
<build or install directory>/share/doc/axon-<version>/<language>/processes.Language: choose en to write english documentation, fr to write french documentation.
Short description: introduction, it is displayed between the name of the process and the title desription.
Parameter: choose the parameter in the process signature you want to document and write its description in the field below.
Long Description: Complete description of the process.
Category documentation
Each sub-directory in the processes directory can have an associated documentation page that is displayed when the user clicks on the directory. This documentation is stored in a file named category_documentation.minf, which is placed in the sub-directory. This file is in minf/XML format and can be edited with any text editor. You can write the documentation in engish and in french but by default, if there is no documentation in the current language, BrainVisa shows the english documentation. So it is important to have at least an english documentation.
Example: category_documentation.minf for “segmentation pipeline” category
<?xml version="1.0" encoding="utf-8" ?>
<minf version="1.0">

  <xhtml name="en">
    <h1>2005-2007 T1-weighted pipeline</h1>

    <p>
      This is where the new 2007 pipeline is.
    </p>
    <p>
      The development of this new pipeline aimed first at improving the robustness of the older (2004) one,
      second at adding some features like providing a spherical mesh of the external interface of the cortex.
      Up to now, we mainly focused on robustness.
      We gathered 100 scans from all over the world, usually chosen for their poor quality in terms of contrast, signal to noise and spatial inhomogeneities.
      The challenge is to get good results for most of them. This means each time we modify something (tuning parameters or changing algorithms),
      the pipeline is iteratively triggered from the beginning for the 100 scans and the results are visually checked.
    </p>

  </xhtml>

  <xhtml name="fr">
    <h1>Analyse des images pondérées en T1 développée en 2005-2007</h1>

    <p>
      C'est ici que se trouve le nouveau pipeline 2007.
    </p>
    <p>
      Le développement de ce nouveau pipeline visait à augmenter la robustesse du précédent (2004) mais aussi à apporter de nouvelles fonctionnalités,
      comme un maillage sphérique de l'interface externe du cortex.
      Jusqu'à présent, nous nous sommes surtout concentré sur la robustesse.
      Notre manière de procéder a consisté à réunir une centaine d'examens provenant d'un peu partout dans le monde.
      Ces examens ont surtout été sélectionnés pour leur faible qualité en termes de contraste, signal sur bruit et inhomogénéités spatiales.
      Chaque fois que nous procédons à un changement (ajustement de paramètre ou nouvel algorithme),
      nous relançons le pipeline sur l'ensemble des données et nous vérifions les résultats visuellement.
    </p>

  </xhtml>

</minf>
The format of this file is very simple, it’s a minf that contains two xhtml fields: en and fr, for the two possible languages of the documentation. In these two fields, you can put any xhtml page.
Links in documentation
In these documentation files, it is possible to make links to processes, categories and to include images. It is also possible to add in a documentation a web link (http://...) using the XHTML syntax.
Link to a process
<a href="bvprocess://process_id"><bvProcessName name="process_id"/></a>
Example: <a href="bvprocess://DiffusionTrackingPipeline"><bvProcessName name="DiffusionTrackingPipeline"/></a>

<a href="bvshowprocess://process_id"><img src="../../images/icons/icon_process.png" border="0"></a>
Example: <a href="bvshowprocess://ImportT1MRI"><img src="../../images/icons/icon_process.png" border="0"></a>
The first syntax creates a link to the documentation page of the process. In the link, the name of the process will appear instead of its identifier. The second syntax creates a link that opens the process when the user clicks on it.
Link to a category
<a href="bvcategory://category_id"><_t_>category_name</_t_></a>
Example: <a href="bvcategory://data management/import"><_t_>import</_t_></a>
It creates a link to the documentation page of the category. The tag <_t_> used in the previous example enables BrainVisa to translate the name into the current language if a translation exists. See Translation.
Include an image
<img src="bvimage://image_relative_path" ... />
Example: <img src="bvimage://diffusion/tracking/pj_main_bundles_front.jpg" width="300"/>
The image file path is relative to brainvisa images directory: <build or install directory>/share/doc/axon-<version>/images/.
Translation
In BrainVisa, two languages are available: english and french. You can switch the current language in BrainVisa preferences. As seen in the previous chapter, documentation pages can be written in the both languages. But you can also translate strings appearing in BrainVisa user interface, as for example processes names, text in menus, buttons…
Get a translation
In a process, you can use the function _t_(string) to translate a string before displaying it. When the process is executed, BrainVisa will call this translation function which searches for a translation of the string in the current language. If no translation is found, the string is unchanged. It can be used for example to translate an error message:
raise RuntimeError(_t_('Cannot convert input data'))
Add a translation
If you use a new string in a process and you want it to be translated, you will need to add its translation to BrainVisa base of translations.
Translation files
The translations are stored in files <brainvisa directory>/doc/<language>/translation.minf. These files in minf format contain a map that matches a string in BrainVisa to its translation (in the language given by the directory where the file is).
There is a file for french translations and another one for english translations. The main is the french one because messages are generally written in english in BrainVisa sources, so they do not need english translations. However, english translations are sometimes used to translate category names. Indeed, a category generally corresponds to a sub-directory in the processes directory, and directory names often miss spaces and case. For example, the category name “segmentationpipeline” has the english translation “Segmentation Pipeline”, which is prettier.
The format of these translation file is minf. It is quite simple and can be edited with any text editor, but a script exists to facilitate the task. It is presented below in Translation editor tool.
Extract of the french translation.minf
<?xml version="1.0" encoding="utf-8" ?>
<minf expander="minf_1.0">
<d>
<s name="<em>%s</em> is not an existing directory. Do you want to create it ?"><em>%s</em> n'est pas un répertoire existant. Voulez-vous le créer ?</s>
<s name="roi">roi</s>
<s name="Anatomist Show Brain Mask on T1 MRI">Anatomist Voir le Masque du Cerveau sur l'IRM T1</s>
<s name="<em>%s</em> processes updated"><em>%s</em> traitements mis-à-jour</s>
<s name="Localize Talairach Coordinate">Localisation de coordonnées de Talairach</s>
<s name="Python version">Version de Python</s>
<s name="Anatomist Show Rainbow Volume">Anatomist Voir Volume Arc-en-ciel</s>
<s name="Create Label Texture">Création d'une Texture de Label</s>
<s name="Brainvisa Show Label Translation">BrainVISA Voir Traduction des Labels</s>
<s name="Nmr command(s) not found">Commande(s) Nmr non trouvée(s)</s>
<s name="(multiple selection possible)">(selection multiple possible)</s>
<s name="Brainvisa Show Text">BrainVISA Afficher du texte</s>
....
<s name="Cannot convert input image to SPM format">Impossible de convertir l'image d'entrée au format SPM</s>
<s name="Mencoder MPEG encoder">Encodeur MPEG Mencoder</s>
<s name="show T2">voir T2</s>
<s name="Anatomist Show ROI">Anatomist Voir ROI</s>
<s name="validation">validation</s>
<s name="Server %s recieved an asynchonous request with invalid parameters from %s: %s">Le serveur %s a reçu une requête asynchrone avec des paramètres invalides de %s: %s</s>
<s name="Echoplanar Distortion Correction">Correction des Distorsions Echoplanaires</s>
<s name="Right Cingular Pole Projection">Projection du Pôle Cingulaire droit</s>
</d>
</minf>
Translation editor tool
The Translation editor is a tool that enables to edit and complete BrainVisa translation files easily. To start it, run the script srcipts/brainvisa/brainvisaTranslation. It parses BrainVisa sources to find all strings on which the translation function is used. These strings are then presented in a window and for each, you can find the following information:
source text
english translation
french translation
source files were the string is used and line number
An icon helps to see directly if a string:
 has a translation
 has no translation
 is no longer used.
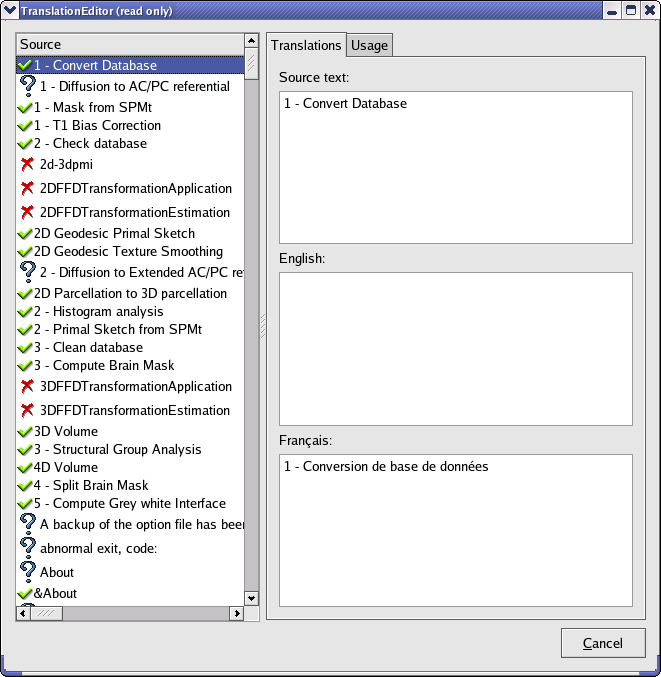
Translation editor interface
