
Download and install BrainVISA
Latest release:
- Release:
6.0
The latest available version is currently: 6.0.39
Detailed instructions
BrainVISA is composed of a set of software, freely distributed in software bundles. Starting from BrainVISA 6.0, the software is distributed as a Conda repository. Conda is a packaging system software, along with reposotories of available installable packages. However Conda is slow, and we prefer the alternative Pixi: Pixi is a package manager fully compatible with Conda packages ecosystem but, at the time of this writing, much more efficient than Conda. However you can install BrainVisa using Pixi, Conda, or Mamba. BrainVisa is available in a conda repository (“channel”) that we maintain, named “neuro-forge”.
We now only maintain Linux packages.
If you are using Windows, you can activate WSL2 (Windows Subsystem for Linux) on your computer, then use the regular Linux installation, it will work.
If you are using MacOS, then you will need to install a virtual machine with Linux inside.
See also Containerized installation below for virtual images.
Thus BrainVisa 6 is modular, contrarily to BrainVisa 5.
Simple installation
see also: Install with Cuda
-
curl -fsSL https://pixi.sh/install.sh | sh
Create an installation (workspace) directory:
mkdir ~/brainvisaSetup workspace:
cd ~/brainvisa
pixi init -c https://brainvisa.info/neuro-forge -c conda-forge
Enter workspace:
pixi shellInstall brainvisa, or anatomist, or other packages:
pixi add brainvisa
Run brainvisa, anatomist, or any other installed software:
brainvisa
Note that using Pixi/Conda, you have access to any other software shipped as Conda packages (and also in Pypi) in the same workspace, if you need. Just use pixi add <package>.
You may specify a version to be installed:
pixi add "brainvisa=6.0.1"
post-install
Note about brainvisa and toolboxes
There is currently a manual part to be performed after a pixi installation of Brainvisa and its toolboxes, because of a current limitation (no post-install scripts). We will try to fix this in a later release, but for now:
- toolbox packages do not contain the processes documentation, only the brainvisa package contains them all. Thus you should better install brainvisa instead of justr morphologisty. However it’s a choice, and it is possible to re-generate the docs afterwards, using the process Tools/documentation/generateDocumentation.
- the shared database of BrainVisa is not updated automatically, thus you should run brainvisa -b --setup after installing soma or any brainvisa toolbox package(s), ex:
pixi add brainvisa
pixi run brainvisa -b --setup
Automatic workspace
If you wish to propose a more “transparent” installation, without the need to start the pixi workspace, for instance to provide a site installation where users could just run brainvisa or anatomist we have a script which makes it:
From the pixi environment, run:
bv_update_bin_links
This will install a bin subdirectory in the workspace, where each command is a link to a script which enters the pixi workspace, then runs the appropriate command. Note that this works only in a Pixi installation, and is not working if you are using Conda or Mamba.
Then you can add this bin directory to your PATH environment variable, for instance in your $HOME/.bashrc:
export PATH="$HOME/brainvisa/bin:$PATH"
(adapt for your actual installation directory, of course)
Note also that, to avoid conflicts with software installed on the system, we have not exposed in the workspace bin/ directory commands which are normally part of a linux system: thus, python or ipython commands are not found there, even if they are shipped in the pixi installation. You can run them by explicitly running the launcher script, bv, for instance:
bv ipython --gui=qt
This will run the ipython command from the pixi environment, where BrainVisa, Anatomist, and other python packages are available:
bv python -c 'import anatomist; print(anatomist.__version__)'
Install with Cuda
The simple installation instructions above will install BrainVisa, which makes use at some points of deep-learning models implemented using PyTorch. The default version coming in the conda-forge repository, however, is not using Cuda and Nvidia GPUs. From a user side for BrainVisa/Morphologist, it does not make a real difference (the only step using it is the sulci identification and is rather fast, even on CPU). But if you wish to mix BrainVisa software with heavier deep learning applications or model training, you should will want to install a Cuda-enabled version of PyTorch.
This can be done in three different alternative ways:
New with pixi 0.71: there is now a GPU enabled
pytorchon conda-forge, but you have ton configurepixi.tomlin order to enbable it: read https://pixi.prefix.dev/latest/python/pytorch/. Once done, you may simply use:pixi add pytorch-gpu
(even in an existing Brainvisa installation environment.)
activate additional Conda channels, where a cuda-enabled version of PyTorch. There are
pytorchandnivdiachannels for Conda, but provide rather old versions of PyTorch. If it is enough for your needs (and your GPU architecture), then go for it.install the soma-pytorch package from our
neuro-forgechannel.
PyTorch + CUDA with pytorch and nvidia Conda channels
This will activate additional Conda channels, and use a bit of tweaking to avoid packages conflicts between channels.
If you don’t need a recent version of PyTorch/CUDA, then this is probably the cleanest way.
The procedure then is:
install Pixi (if not already done):
curl -fsSL https://pixi.sh/install.sh | sh
Create a workspace directory:
mkdir ~/brainvisaSetup workspace with additional channels, and fix conflicts:
cd ~/brainvisa
pixi init -c https://brainvisa.info/neuro-forge -c pytorch -c nvidia -c conda-forge

echo 'soma-env = ">=0.0"' >> pixi.toml
echo 'libjpeg-turbo = {channel= "conda-forge", version= ">=3.0"}' >> pixi.toml
echo "" >> pixi.toml
echo "[pypi-dependencies]" >> pixi.toml
echo 'dracopy = ">=1.4.2"' >> pixi.toml
Enter workspace:
pixi shellInstall anatomist or brainvisa, or other:
pixi add anatomist
Run anatomist:
anatomist
See also the post-install section.
PyTorch + CUDA with the soma-pytorch package
This method consists in installing the package soma-pytorch in pixi.
This will, under the hood, install another PyTorch using pip, in a different location (.pixi/envs/default/brainvisa-override/). It will be installed in addition to the one from Conda, and the actuall installation will take place when you restart your pixi environment. This takes a bit of time (the time needed to download and install the pip package, which is rather big). The PYTHONPATH environment variable is used for this and set automatically.
However here, PyTorch is installed twice and dependencies between Conda/Pixi packages and pip/Pypi are probably not handled correctly. Moreover the additional PyTorch package is about 1.6 GB large (at the present time).
Pip (Pypi) provides more recent versions of PyTorch with CUDA enabled than what can be found in Conda channels. Thus this installation mode is needed if you need a recent PyTorch with Cuda, which is needed for some newer GPU architectures.
The procedure then is:
install Pixi (if not already done):
curl -fsSL https://pixi.sh/install.sh | sh
Create a workspace directory:
mkdir ~/brainvisaSetup workspace:
cd ~/brainvisa
pixi init -c https://brainvisa.info/neuro-forge -c conda-forge
pixi add morphologist=6.0 soma-pytorch
Enter workspace:
pixi shell
this pixi shell operation will take some time the first time, since the actuall installation of PyTorch will happen at this moment, in a completely silent way (nothing is print on the terminal). Just be patient.
This is is.
See also the post-install section.
WSL2 on Windows
Windows 10 and later and requires a technology (deployed in late summer 2020, your system must have been updated afterward) allowing to run Linux in Windows. This technology, called Windows Subsystem For Linux 2 (WSL2) must be enabled on the system. Then a Linux distro must be installed from the Microsoft Store. Finally an X Windows server must be installed and started.
We recommend that you install Ubuntu 24.04. Follow the installation steps defined in Windows Subsystem for Linux Installation Guide for Windows 10.
Once these steps are done, you will have a fully functionnal Linux running as a Windows 10 App. Therefore, you will have to follow the regular installation instructions for Linux.
Containerized installation
In some some situations it may be difficult to install a Conda/Pixi environment, either if the system is not natively a Linux system, or on a HPC where internet connection is disabled or limited. In this situations it is also possible to use a container which contains, or allows to use, the Pixi installation through the container.
For this, we still maintain a variant of the Casa-Distro container distribution system which allows to build such a container. For now we have not provided “official” BrainVisa distributions in such shape, but you can find a build procedure in the developers website.
Here are some Apptainer images.
Light images
They contain Pixi and allows to install brainvisa (or other) packages in a modular way on the host machien filesysem. They do not necessarily change at each packages version since they are just the installation system, not the installed packges which can be updated separately.
| file | version | size | date | metadata (md5) |
|---|---|---|---|---|
| casa-pixi-5.4-4.sif | 229.2 MB | 2026-03-10 | metadata |
Monolithic images
They contain the full BrainVisa public distibution.
| file | version | size | date | metadata (md5) |
|---|---|---|---|---|
| brainvisa-6.0.39.sif | 6.0.39 | 6.5 GB | 2026-07-02 | metadata |
| brainvisa-6.0.38.sif | 6.0.38 | 6.5 GB | 2026-06-30 | metadata |
| brainvisa-6.0.37.sif | 6.0.37 | 6.5 GB | 2026-06-16 | metadata |
| brainvisa-6.0.36.sif | 6.0.36 | 6.5 GB | 2026-06-05 | metadata |
| brainvisa-6.0.34.sif | 6.0.34 | 5.7 GB | 2026-03-11 | metadata |
| brainvisa-6.0.33.sif | 6.0.33 | 5.7 GB | 2026-03-06 | metadata |
| brainvisa-6.0.32.sif | 6.0.32 | 5.7 GB | 2026-02-27 | metadata |
We do not systematically build and provide these images, thus the list here may be empty. We can build them when needed, or anyone can also easily build such a container, by following the doc here: https://dev.brainvisa.info/pixi_in_container.html
Installation
In both cases, the installation procedure is the same as the older 5.x Casa-Distro releases.
download the
.sifimage (let’s call itbrainvisa-pixi-6.0.sifrun the image setup, as in casa-distro:
mkdir brainvisa-pixi-6.0
apptainer run -c -B brainvisa-6.0:/casa/setup brainvisa-pixi-6.0.sif
if the image is a lightweight one, then the actuall installation of brainvisa packages will take place at the first run of the container:
brainvisa-6.0/bin/bv bashin a lightweight image, you may upgrade or install packages:
pixi update brainvisa
pixi add soma-pytorch solar  # for instance
Developer environment installation
Building a full development environment for BrainVisa can be done in Pixi also.
It now is a matter of installing the soma-env project from GihHub and running pixi in it, then bv_maker. Instructions are found on https://github.com/brainvisa/soma-env.
The soma-env + pixi frame ensures to respect all requirements and dependencies and stay entirely compatible with the official distribution for a given BrainVisa version.
There is (or will be) more detailed documentation for developing and building additional packages on the developers website:
Getting started
Three main programs, brainvisa, anatomist, and morphologist are available directly in the Pixi / Conda environment. A lot of other programs are also present here.
anatomist is the interactive 3D visualization software.
morphologist is the new user interface for the main Morphologist pipeline.
brainvisa is the user interface to Axon, which will generally be the entry point to all other applications and toolboxes. You may also have access to morphologist and anatomist from the brainvisa program.
Once started, brainvisa will need a bit of configuration: go to the “BrainVISA / Preferences” menu, and setup especially paths to external software such as Matlab, SPM, FSL or Freesurfer if you have installed them.
BrainVISA is working with files and directories organizations, and local databases, more generally regrouped under the term “databases”. You will have to setup at least one to make it work in optimal conditions. At the beginning a database is a new, empty directory, where BrainVISA will import unprocessed data and write processed data.
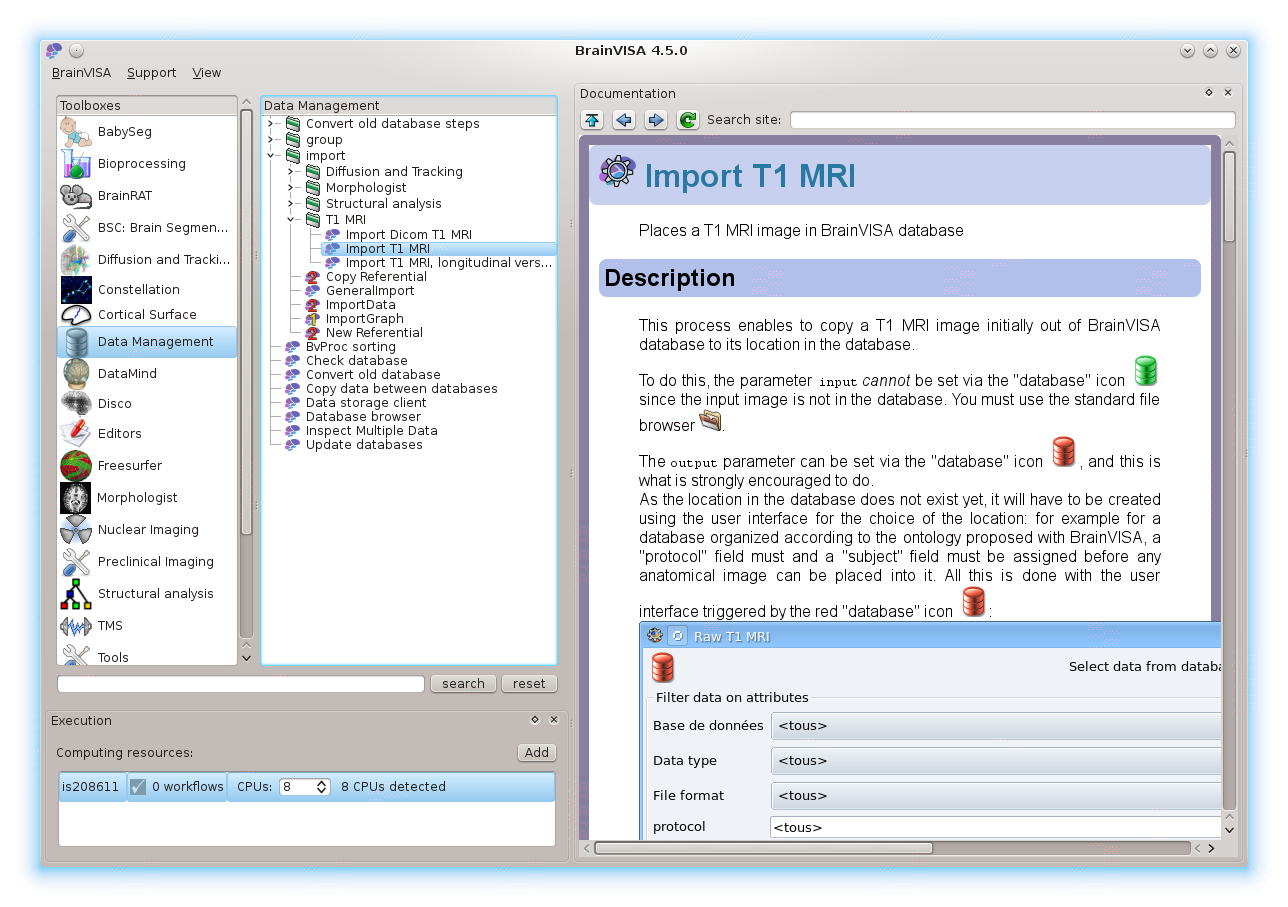
Before running processing, raw data thus has to be imported in such a database: use the “Data management” tools, “import” to do so. For T1 MRI processing (using Morphologist), you will typically use the “Import T1 MRI” process, or the “Import DICOM T1 MRI” process. Appropriate import processes are generally also found in processing toolboxes.
More information may be found in the Axon tutorial and, more generally in the Axon documentation.
Licences
Globally, it is free for a non-profit usage.
As the whole set of software contains several sub-packages, each may have its specific licencing policy. See individual modules for licence information.
Some are “really” free and open source (CeCILL-B, BSD-like licence), some are CeCILL-v2 (GPL-compatible), and some are closed source with free binary distribution for non-profit usage.
The core is as free as possible: CeCILL-B when possible, or CeCILL-v2 when using PyQt which is GPL:
Axon is CeCILL-v2
Anatomist is CeCILL-B, with some additional python plugins which are bound to GPL.
AIMS (image processing tools) is CeCILL-B
CeCILL licences are compatible with their GPL or BSD equivalent, but with additional legal precisions for french laws. See http://www.cecill.info/index.en.html
This basically leaves the possibility for toolboxes developers to choose the licence which suits them (open or closed), with some PyQt (GUI) parts which have to be GPL-compatible.
Morphologist, BrainRAT, cortical_surface and some other toolboxes also include closed-source code in their algorithmic parts. They can be used freely for non-profit usage.
Typically academic research applications are OK.
Commercial applications of these toolboxes should contact their authors before proceeding.
Older BrainVISA versions
- Versions 5.x:
- Versions 4.5-4.6:
- Version 4.4 and older:
- data: