
Download and install BrainVISA
Quick links (latest release)
- Release:
5.1.2
If you already know how to install, use this. Otherwise go to the explanations next.
| name | version | container type | size | date | metadata (md5) |
|---|---|---|---|---|---|
| brainvisa-5.1.2.sif | 5.1.2 | singularity | 7.8 GB | 2024-06-28 | metadata |
| brainvisa-5.1.2.ova | 5.1.2 | vbox | 5.2 GB | 2024-06-28 | metadata |
Detailed instructions
BrainVISA is composed of a set of software, freely distributed in software bundles. Starting from BrainVISA 5.0, the software is distributed using virtualization. It means that there is only one BrainVISA version running on Linux but, thanks to virtualization, it can be used on any system. There are BrainVISA images for two free and open source virtualization technologies :
apptainer: an operating-system-level virtualization (also known as containerization) technology well suited for high performance computing and for users without administration privileges (as compared to Docker, a more popular containerization technology).
VirtualBox: an hypervisor allowing to run virtual machines and available on main operating systems (Linux, Windows, MacOs).
For Mac Silicon users, see the dedicated section Mac Silicon install.
Using virtualization allows to solve many porting and compatibility issues (especially packaging and distributing packages for many different operating systems). Now we only provide Linux containers for a single Linux system / version, which can be run on almost every host system.
But virtualization have 3 main drawbacks:
modularity is gone: virtual images are not designed to be modular, so we cannot install just parts of it. You get the whole BrainVISA distribution. But in practice we never heard about anyone installing just a part of the packages in the previous distrubtions.
Programs must always be run through the virtualization layer, and not natively on the system. It can add some overhead, but this is light in most cases.
3D with hardware acceleration may not work out of the box. But it will, in most cases.
Plan:
To use BrainVISA on your system, first read the Prerequisites section. Then, if you just want to use the software, go to Install with Apptainer or Install with VirtualBox section. But if you want to develop BrainVISA related software, go to the Developer environment installation section.
In other words:
Prerequisites
Prerequisite are the software that need to be installed on your computer in order to be able to install and use BrainVISA. They differ according to the virtualization technology you want to use (Apptainer or VirtualBox). We recommend using Apptainer for Linux and VirtualBox for Windows and MacOS. It works well but is more complex to setup (explaination below). Note that we had mitigate experiences on MacOS using both VirtualBox or Apptainer, even if both somewhat worked.
Prerequisites for Apptainer on Linux
For Linux, two software must be installed : Python (version >= 3 is required for releases >= 5.1) and Apptainer (the successor of Singularity). Most popular Linux distro come with Python already installed but if not, there are system package to install it. The name of the package to install is python. For example for Debian based distro:
sudo apt install python
Apptainer is now available as system package for popular Linux distributions.
If no package can be found for your system, then follow Apptainer installation instructions
Prerequisites for VirtualBox
A recent version of VirtualBox ( >= 6.1) must be installed for the user of the system.
See the troubleshooting section, especially for Mac. On Mac see also Mac Silicon install.
Prerequisites for Apptainer on Windows
Using Apptainer on Windows works only with Windows 10 and requires a recent technology (deployed in late summer 2020, your system must have been updated afterward) allowing to run Linux in Windows. This technology, called Windows Subsystem For Linux 2 (WSL2) must be enabled on the system. Then a Linux distro must be installed from the Microsoft Store. Finally an X Windows server must be installed and started.
Once these steps are done, you will have a fully functionnal Linux running as a Windows 10 App. Therefore, you will have to follow the Prerequisites for Apptainer on Linux section and then the Install with Apptainer section.
Install WSL2 and Linux
We recommend that you install Ubuntu 20.04. Follow the installation steps defined in Windows Subsystem for Linux Installation Guide for Windows 10.
Install an X Windows server
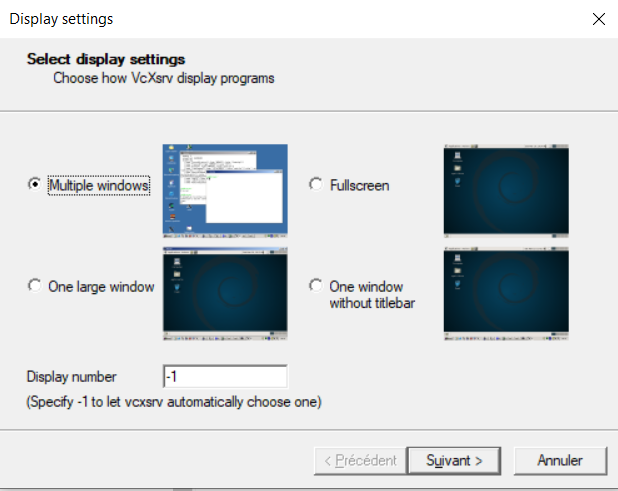
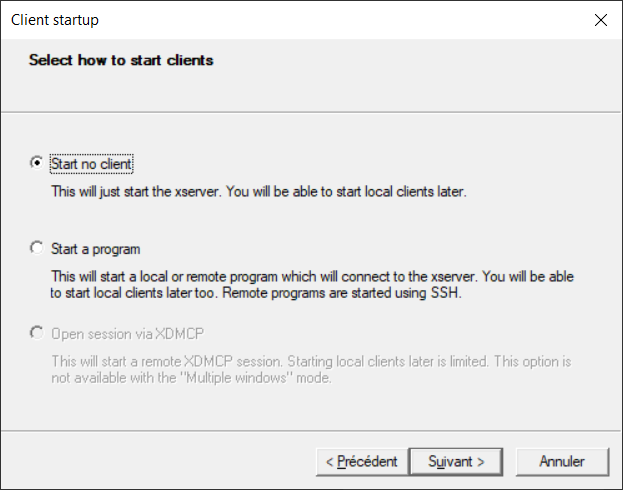
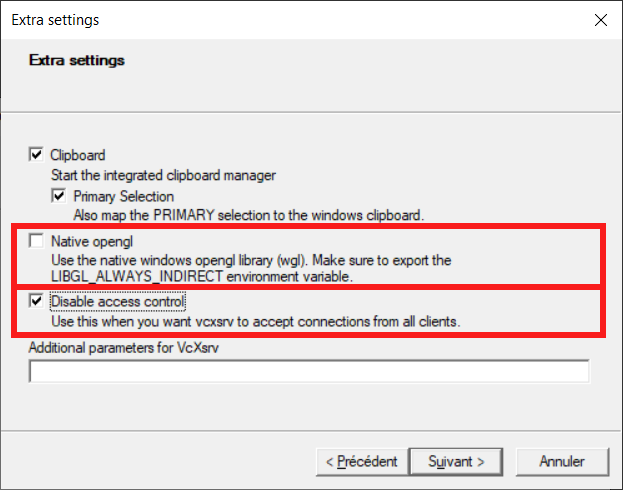
Linux is an old system with many programs using text-based user interface an no graphical user interface (GUI). For now, it is necessary to install a third-party App to run any Linux App with a GUI, but Microsoft announced on //build 2020 that they will release soon an improvement that will not require any third-party component to run Linux GUI Apps on Windows Desktop (source). The graphical interface for Linux is based on a technology called X Windows and the App to install is an X Windows server.
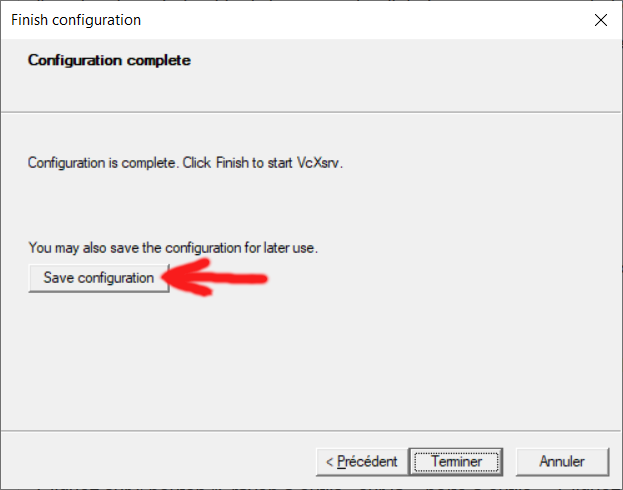
There exists many X Windows servers for Windows. For a free and open source one, we recommend VcXsrv. On its web page, click on the Download button to get an installer program. Once installed, you can run X Launch to configure and start the server. The following images shows the options we recommend for the various steps of the setup. On the last step, you can save the configuration in a file that will allow to quickly restart the server by just double clicking on the saved file.
Prerequisites for Apptainer for MacOS
Python
Python is already installed on MacOS systems.
Apptainer
See: `https://apptainer.org/docs/admin/main/installation.html#installation-on-windows-or-mac`_.
X server
On Mac XQuartz is part of the system but needs some setup: see also this doc.
Install with Apptainer
Create an installation directory:
mkdir $HOME/brainvisa-5.0.0
Download the BrainVISA image found below into this new directory. It’s a
.siffile, for instancebrainvisa-5.0.0.sif.
| file | version | size | date | metadata (md5) |
|---|---|---|---|---|
| brainvisa-5.1.2.sif | 5.1.2 | 7.8 GB | 2024-06-28 | metadata |
| brainvisa-5.1.1.sif | 5.1.1 | 6.4 GB | 2023-03-21 | metadata |
| brainvisa-5.1.0.sif | 5.1.0 | 6.4 GB | 2023-02-01 | metadata |
| brainvisa-5.0.4.sif | 5.0.4 | 3.7 GB | 2021-12-22 | metadata |
Run Apptainer using this image, with an option to tell it to run its setup procedure. The installation directory should be passed:
apptainer run -c -B $HOME/brainvisa-5.0.0:/casa/setup $HOME/brainvisa-5.0.0/brainvisa-5.0.0.sif
(note the option
-coption which avoids mixing up user configuration files from the host in the container)set the
bin/directory of the installation directory in thePATHenvironment variable of your host system config, typically in$HOME/.bashrcor$HOME/.bash_profileif you are using a Unix Bash shell:export PATH="$HOME/brainvisa-5.0.0/bin:$PATH"
Optionally, you may want to run the configuration GUI, through the
bvprogram. Since BrainVISA is running in a container, it cannot access your computer directories unless you make them available to the container. Adding directories is done graphically, simply using the following command:bv
Installation is finished, you can run programs from the container.
There are several ways actually:
The simplest way, call commands directly from the above
PATHlike if they were on the host machine:# run programs AimsFileInfo --info anatomist brainvisa
Using bv interface to containers or casa_distro:
The bv program is found in each install directory into
binsubdirectory in order to be always compatible with this installed environment (thus you can install and use several BrainVISA version at the same time).bv accepts an executable program name as sub-command, it allows to run programs installed inside the container, for instance:
bv brainvisa
bv anatomist
bv AimsFileInfo -h
or to open an interactive shell in the container:
bv bashMore options may be used. See the complete documentation of the bv command.
If you are using BrainVISA using Apptainer or Docker containers, graphical software need to run the containers with a graphical “bridge”: a X server has to be running on the host system, and 3D display may or may not work. The options
gui=yesandopenglof the bv command try to handle common cases, possibly using Nvidia proprietary OpenGL implementation and drivers from the host system.Note that the option
gui=yesis now the default, thus it is not needed.see the troubleshooting section, especially the OpenGL troubleshooting, Singularity on Mac and Singularity on Windows subsections.
See also the OpenGL troubleshooting section for if you experience problems using 3D rendering.
Configuration of BrainVisa in a Apptainer container
Please read this document.
Install with VirtualBox
To use BrainVISA with VirtualBox, the procedure is roughly the same on Linux, Windows and Mac machines.
VirtualBox must be installed for the user of the system.
Download a VirtualBox image foud in the following table.
Note that you don’t need to download an image built for your host system, the virtualization allows precisely to run, for instance, an Ubuntu-18.04 image, on any host system (Linux, Windows, or Mac).
Available VirtualBox BrainVisa images:
file version size date metadata (md5) brainvisa-5.1.2.ova 5.1.2 5.2 GB 2024-06-28 metadata brainvisa-5.1.1.ova 5.1.1 5.2 GB 2023-03-21 metadata brainvisa-5.1.0.ova 5.1.0 10.5 GB 2023-02-01 metadata brainvisa-5.0.4.ova 5.0.4 7.3 GB 2021-12-22 metadata start
virtualboxin VirtualBox, import the downloaded image - some configuration (memory, CPU, video, sound etc) may be useful for it in VirtualBox.
some mount points to the host filesystem can be added to see the host filesystem directories from the VM.
start it
in the running Linux virtual machine, BrainVISA is installed and configured. You can open a terminal and type:
AimsFileInfo -h
brainvisa
anatomist
The virtual machine has a configured user named “brainvisa”, with the password “brainvisa”, which has sudo (admin) permissions.
see the troubleshooting section, especially the VirtualBox on Mac subsection.
Developer environment installation
The requirements are the same as for user installs. The main difference is that developers will get source code from source repositories, and compile the whole code. To do that, we have published “developer images” which contain all the required development tools and libraries. To date, we only support development environments using Apptainer. But we plan to provide image and instruction for VirtualBox too.
If you want to develop software using the BrainVISA environment, you are advised to read the developer section of the Casa-Distro project.
Installing an Apptainer developer environment
follow the Prerequisites section as for users.
Create an installation directory:
mkdir -p $HOME/casa_distro/brainvisa-opensource-master
(note that we are using a slightly different directories organization from the user case, because the images here can be reused and shared betwen several development configurations - but this organization is not mandatory, it will just make things simpler for the management tool casa_distro if it is used later)
Download the
casa-devimage found here (https://brainvisa.info/download/), preferably into the$HOME/casa_distrodirectory. It’s a.siffile, for instancecasa-dev-5.0.sif.Note that you don’t need to download an image built for your host system, the virtualization allows precisely to run, for instance, an Ubuntu-18.04 image, on any host system (Linux, Windows, or Mac).
| image | size | date | base system | metadata (md5) |
|---|---|---|---|---|
| casa-dev-5.3-29.sif | 4.1 GB | 2025-11-18 | ubuntu-22.04 | casa-dev-5.3-29.sif.json |
| casa-dev-5.3-28.sif | 4.1 GB | 2024-10-07 | ubuntu-22.04 | casa-dev-5.3-28.sif.json |
| casa-dev-5.3-27.sif | 4.0 GB | 2024-10-04 | ubuntu-22.04 | casa-dev-5.3-27.sif.json |
| casa-dev-5.3-26.sif | 3.9 GB | 2024-07-15 | ubuntu-22.04 | casa-dev-5.3-26.sif.json |
| casa-dev-5.3-25.sif | 4.0 GB | 2023-11-13 | ubuntu-22.04 | casa-dev-5.3-25.sif.json |
| casa-dev-5.3-24.sif | 4.0 GB | 2023-11-07 | ubuntu-22.04 | casa-dev-5.3-24.sif.json |
| casa-dev-5.3-23.sif | 4.0 GB | 2023-10-30 | ubuntu-22.04 | casa-dev-5.3-23.sif.json |
| casa-dev-5.3-22.sif | 4.0 GB | 2023-09-14 | ubuntu-22.04 | casa-dev-5.3-22.sif.json |
| casa-dev-5.3-20.sif | 4.1 GB | 2023-05-09 | ubuntu-22.04 | casa-dev-5.3-20.sif.json |
Execute the container image using Apptainer, with an option to tell it to run its setup procedure. The installation directory should be passed, and it will require additional parameters to specify the development environment characteristics. Namely a distro argument will tell which projects set the build will be based on (valid values are opensource, brainvisa, cea etc.), a branch argument will be master, latest_release etc., and other arguments are optional:
apptainer run -c -B $HOME/casa_distro/brainvisa-opensource-master:/casa/setup $HOME/casa_distro/casa-dev-5.0.sif branch=master distro=opensource
(note the option
-coption which avoids mixing up user configuration files from the host in the container)set the
bin/directory of the installation directory in thePATHenvironment variable of your host system config, typically in$HOME/.bashrcor$HOME/.bash_profileif you are using a Unix Bash shell:export PATH="$HOME/casa_distro/brainvisa-opensource-master/bin:$PATH"
Optionally, you may want to run the configuration GUI, through the
bvprogram: as programs are actually running in a container or a virtual machine (transparently), the user may have to configure additional mount points to actually see his data and working directories from his host machine in the container. This is done graphically, simply using:bv
The development system is ready in the container, and BrainVISA build system (brainvisa-cmake) is available. You may need to configure the projects you want to retreive / build, and set the login / passwords in the sources repositories for non-public sources, if needed.
You can open a terminal using:
bv bashthen build from within the terminal:
bv_maker
or start it from outside the container:
bv_maker
(this will run the bv program wich will call commands inside the container)
Technically,
bvis a simplified version of casa_distro which is contained inside a single environment (distribution installation) and only allows to run and configure this environment. See the doc of casa-distro for more details.
Installing a VirtualBox developer environment
Download the
casa-devVirtualBox image:
| image | size | date | base system | metadata (md5) |
|---|
import the image and configure it in VirtualBox just like the BrainVisa users images
inside the image, edit, check or complete the config files, especially
/casa/conf/svn.secretand/casa/conf/bv_maker.cfgthe develper tools and directories are already setup. The
bv_makercommand is available.
Mac Silicon install
Mac machines are now using ARM processors which architecture is not compatible with the x86_64 distribution that we provide. Even running a virtual machine is a challenge.
We have a recipe to make things together, which has been sent by an anonymous user, who we thank gratefully. This solution uses CPU emulation plus a virtual machine. Here are the instructions:
Step 1:
Download and convert vbox image to QEMU (the exact URL may change).
Can do this with the curl command from your terminal:
$ curl -O https://brainvisa.info/download/brainvisa-5.1.2.ova
Step 2:
Unpack the downloaded .ova file:
$ tar xvf brainvisa-5.1.2.ova
x brainvisa-5.1.2.ovf
x brainvisa-5.1.2-disk001.vmdk
This creates the 2 files shown above. The key file here is the VirtualBox disk image - the .vmdk file.
Step 3:
Download and Install UTM (https://mac.getutm.app).
Step 4:
Open UTM
Select: (+) Create a new Virtual Machine
This brings up a series of pages:
On Start page: Select Emulate
On Operating System page: Select Other
On Other page: Select Boot Device -> None, then Continue
On Hardware page, select:
Architecture: make sure this is x86_64
System: leave this as default option
Memory: leave this as default (4096 MB) for now - can increase this later if needed.
CPU: select 2 CPU cores for now - can increase this later. (NB: This VM seems to need >=2 cores, I found reasonable performance with 4 cores)
Then click
Continue
On Storage page: Select how much storage you need your virtual machine to have.
On Shared Directory page: Ignore for now and click Continue. (See Step 5 to set up)
On Summary page:
Set Name to “BrainVisa” or similar name of your choosing.
Check
Open VM Settings.Then click
Save
This will now open up the full VM settings, where you’ll need to do the following:
System tab: Check Force Multicore. (This seemed necessary to get this VM to work, not 100% sure why!)
QEMU: Uncheck UEFI Boot.
Drives -> IDE Drive: Click Delete to delete the virtual hard drive that UTM created for you.
Drives -> New... -> Import...: Navigate to the brainvisa-5.1.2-disk001.vmdk file extracted from the .ova file earlier.
Click Save. It’ll then take a few seconds to import the disk image and create your new VM.
Your new VM should hopefully then appear in the main UTM screen.
Click on the Play icon to launch it.
This should show a Linux bootup sequence, then a Linux desktop (running the LXDE desktop environment) after ~10 seconds.
If it seems to get stuck at “Set console scheme”, make sure you picked at least 2 CPU cores & Force Multicore. You can change these via the VM settings.
Once the VM is working, you can delete the downloaded .ova (and extracted .ovf & .vmdk files) - UTM will have made its own working copy of this. You can see where this is by right-clicking on the VM and picking "Show in Finder" from the menu.
Step 5 (Optional):
Configuring the Shared Directory: This follows steps outlined by UTM (https://docs.getutm.app/guest-support/linux/#virtfs)
Close your Virtual machine, right click on the machine and select
editto open settings.Go to
Sharing, changeDirectory Share Modeto VirtFS and select a folder path you which to share between host and virtual machines.
Now start and open terminal within the virtual machine. Enter the following commands:
$ sudo mkdir [mount point]
$ sudo mount -t 9p -o trans=virtio share [mount point] -oversion=9p2000.L
Where [mount point] is the desired destination path. For example: /media/share
(NB: When running sudo, you be asked for the root password for brainvisa. The password is: brainvisa)
Your shared directory should now be visible under Devices, you may need to restart your machine. From this volume you can drag and drop files directly into BrainVisa applications.
Getting started
Three main programs, brainvisa, anatomist, and morphologist are available directly in the bin directory of the installed software. A lot of other programs are also present here.
anatomist is the interactive 3D visualization software.
morphologist is the new user interface for the main Morphologist pipeline.
brainvisa is the user interface to Axon, which will generally be the entry point to all other applications and toolboxes. You may also have access to morphologist and anatomist from the brainvisa program.
Once started, brainvisa will need a bit of configuration: go to the “BrainVISA / Preferences” menu, and setup especially paths to external software such as Matlab, SPM, FSL or Freesurfer if you have installed them.
BrainVISA is working with files and directories organizations, and local databases, more generally regrouped under the term “databases”. You will have to setup at least one to make it work in optimal conditions. At the beginning a database is a new, empty directory, where BrainVISA will import unprocessed data and write processed data.
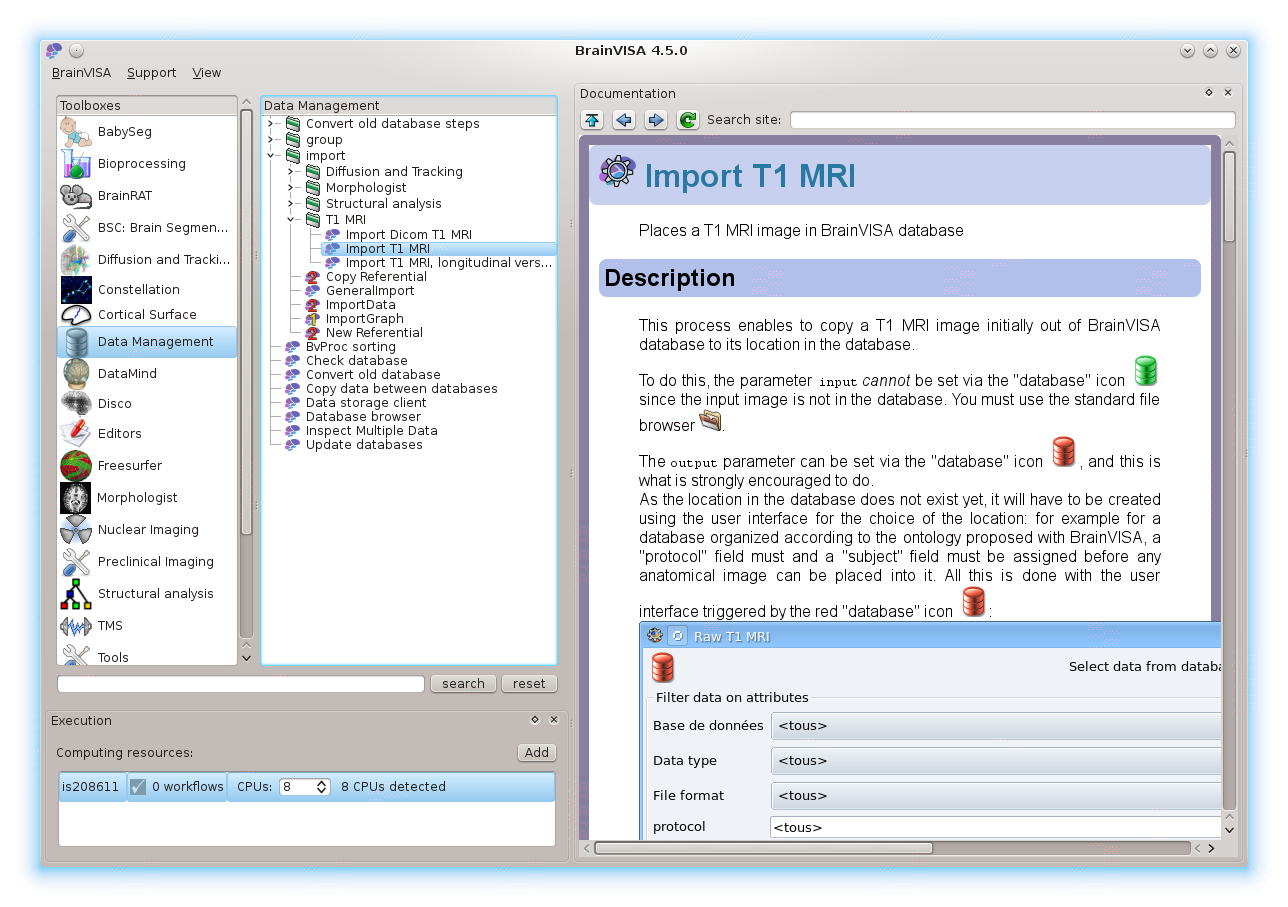
Before running processing, raw data thus has to be imported in such a database: use the “Data management” tools, “import” to do so. For T1 MRI processing (using Morphologist), you will typically use the “Import T1 MRI” process, or the “Import DICOM T1 MRI” process. Appropriate import processes are generally also found in processing toolboxes.
More information may be found in the Axon tutorial and, more generally in the Axon documentation.
Licences
Globally, it is free for a non-profit usage.
As the whole set of software contains several sub-packages, each may have its specific licencing policy. See individual modules for licence information.
Some are “really” free and open source (CeCILL-B, BSD-like licence), some are CeCILL-v2 (GPL-compatible), and some are closed source with free binary distribution for non-profit usage.
The core is as free as possible: CeCILL-B when possible, or CeCILL-v2 when using PyQt which is GPL:
Axon is CeCILL-v2
Anatomist is CeCILL-B, with some additional python plugins which are bound to GPL.
AIMS (image processing tools) is CeCILL-B
CeCILL licences are compatible with their GPL or BSD equivalent, but with additional legal precisions for french laws. See http://www.cecill.info/index.en.html
This basically leaves the possibility for toolboxes developers to choose the licence which suits them (open or closed), with some PyQt (GUI) parts which have to be GPL-compatible.
Morphologist, BrainRAT, cortical_surface and some other toolboxes also include closed-source code in their algorithmic parts. They can be used freely for non-profit usage.
Typically academic research applications are OK.
Commercial applications of these toolboxes should contact their authors before proceeding.
Older BrainVISA versions
- Versions 4.5-4.6:
- Version 4.4 and older:
- data: